Mapping
Maintenance
Designing Good Maintenance
A Mapper’s Guide to the Underbelly
Maintenance isn’t an afterthought. It isn’t filler space between departments, and it certainly isn’t just somewhere to throw power cables and random loot. In good maps, maintenance is a secondary circulatory system. It is full of secrets, tension, atmosphere, and storytelling. Done well, it encourages movement, exploration, and fear. Done poorly, it becomes forgettable.
This article aims to bring together practical station design principles with real-world examples and community wisdom to help you shape your maintenance into something functional and memorable. Thanks to mappers like Southbridge, CrimsonJupiter, and co for being awesome and giving me references.
Why Maintenance Feels Bad When It’s Bad
Many mappers fall into the trap of thinking maintenance is just a dark hallway with less lighting. The result? One-tile-wide straight lines that run like electrical wires, only serving to connect A to B, nothing more. Players don’t explore these halls. They don’t fight in them. They hold one movement key and move through in silence, gaining nothing and leaving nothing behind.
Worse still is when these hallways lead nowhere: dead ends with nothing to find, or maintenance “loops” that just circle one department like a train track without stations. These layouts don't reward navigation or knowledge. They feel like wasted space.
If a player can walk through your entire maintenance section without seeing something new, taking a different route, or making a single decision, your layout probably isn't doing its job.
[EXAMPLE IMAGE: Dead-straight maintenance corridor or a single-access path trapped in a single department]
[EXAMPLE IMAGE: Single-wide maintenance corridor]
Maintenance Has Purpose: Give It One
There’s a reason maintenance exists in gameplay terms: it's where people hide, where antags run, where flanks form, where traitors roam. So when you design a maintenance path, ask yourself:
- Can someone escape through this?
- Can someone be ambushed here?
- Is this a space worth checking twice?
- Could someone build something here?
If the answer is "no" across the board, you’ve mapped a dead space. Good maintenance gives people options. It connects multiple places (ideally two or more departments and a hallway), provides alternate paths around secure areas, and lets creative players repurpose forgotten corners into side projects: bars, hideouts, or even traps.
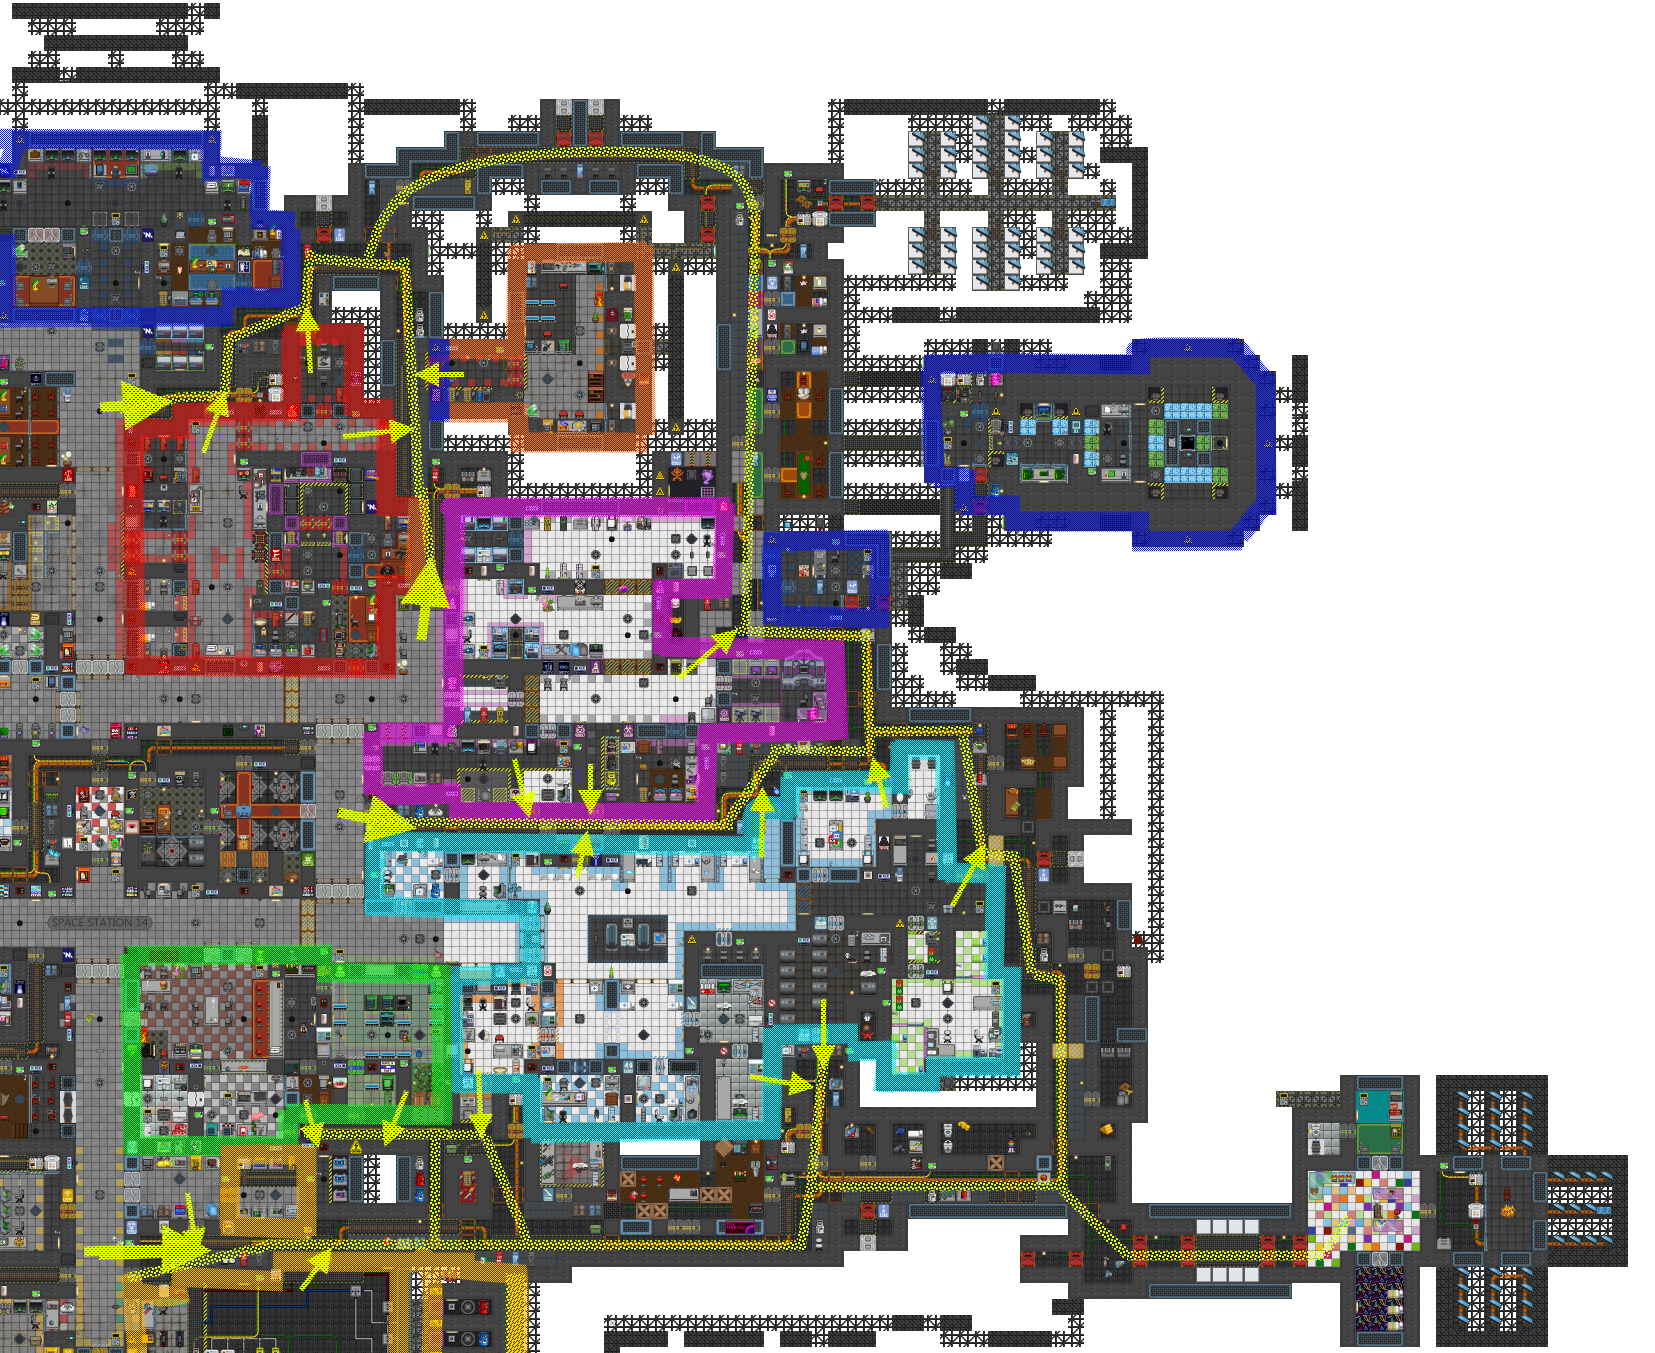
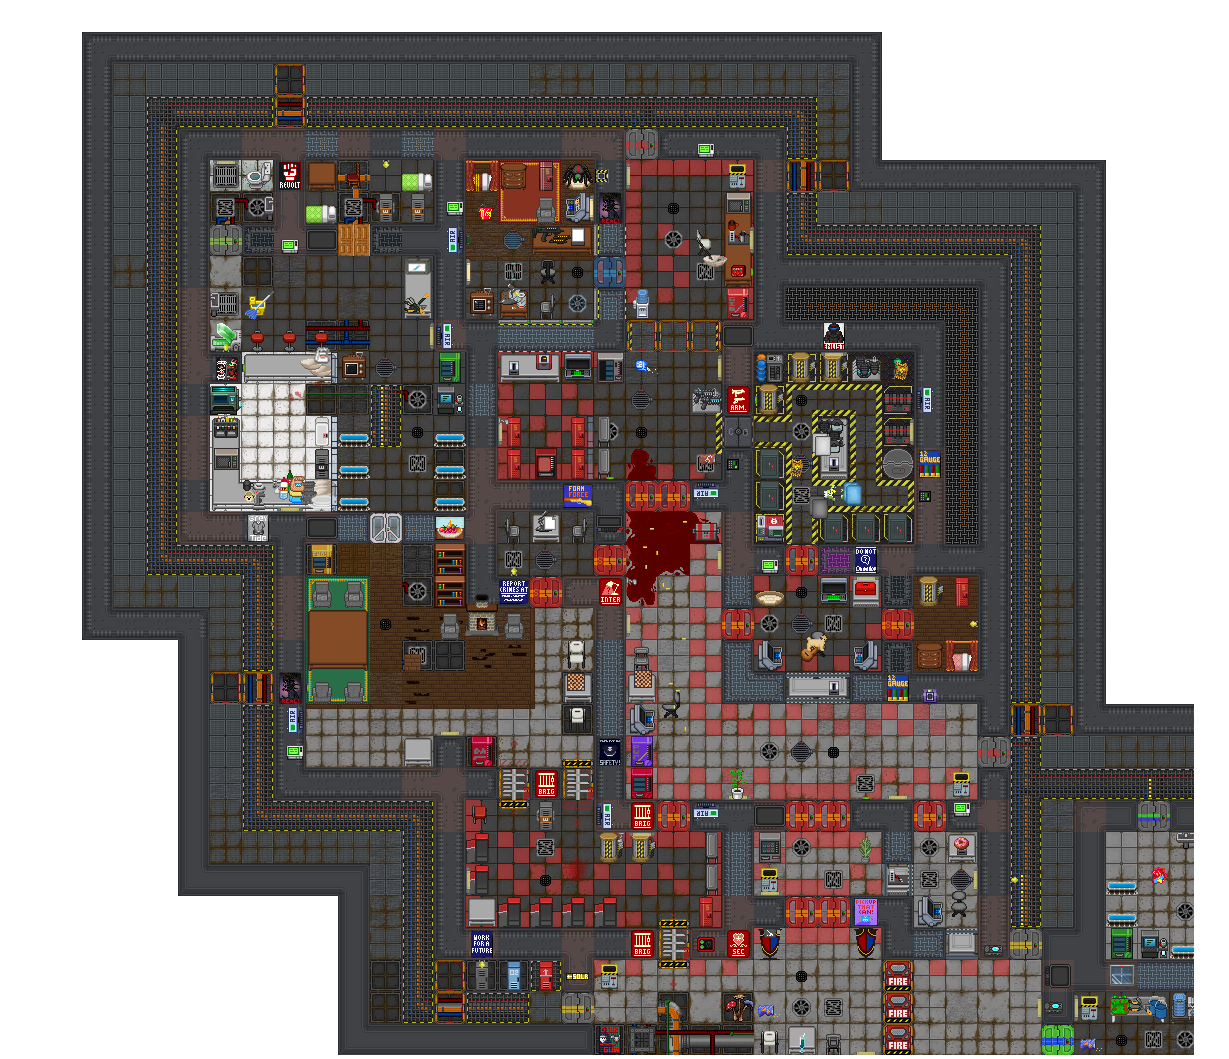
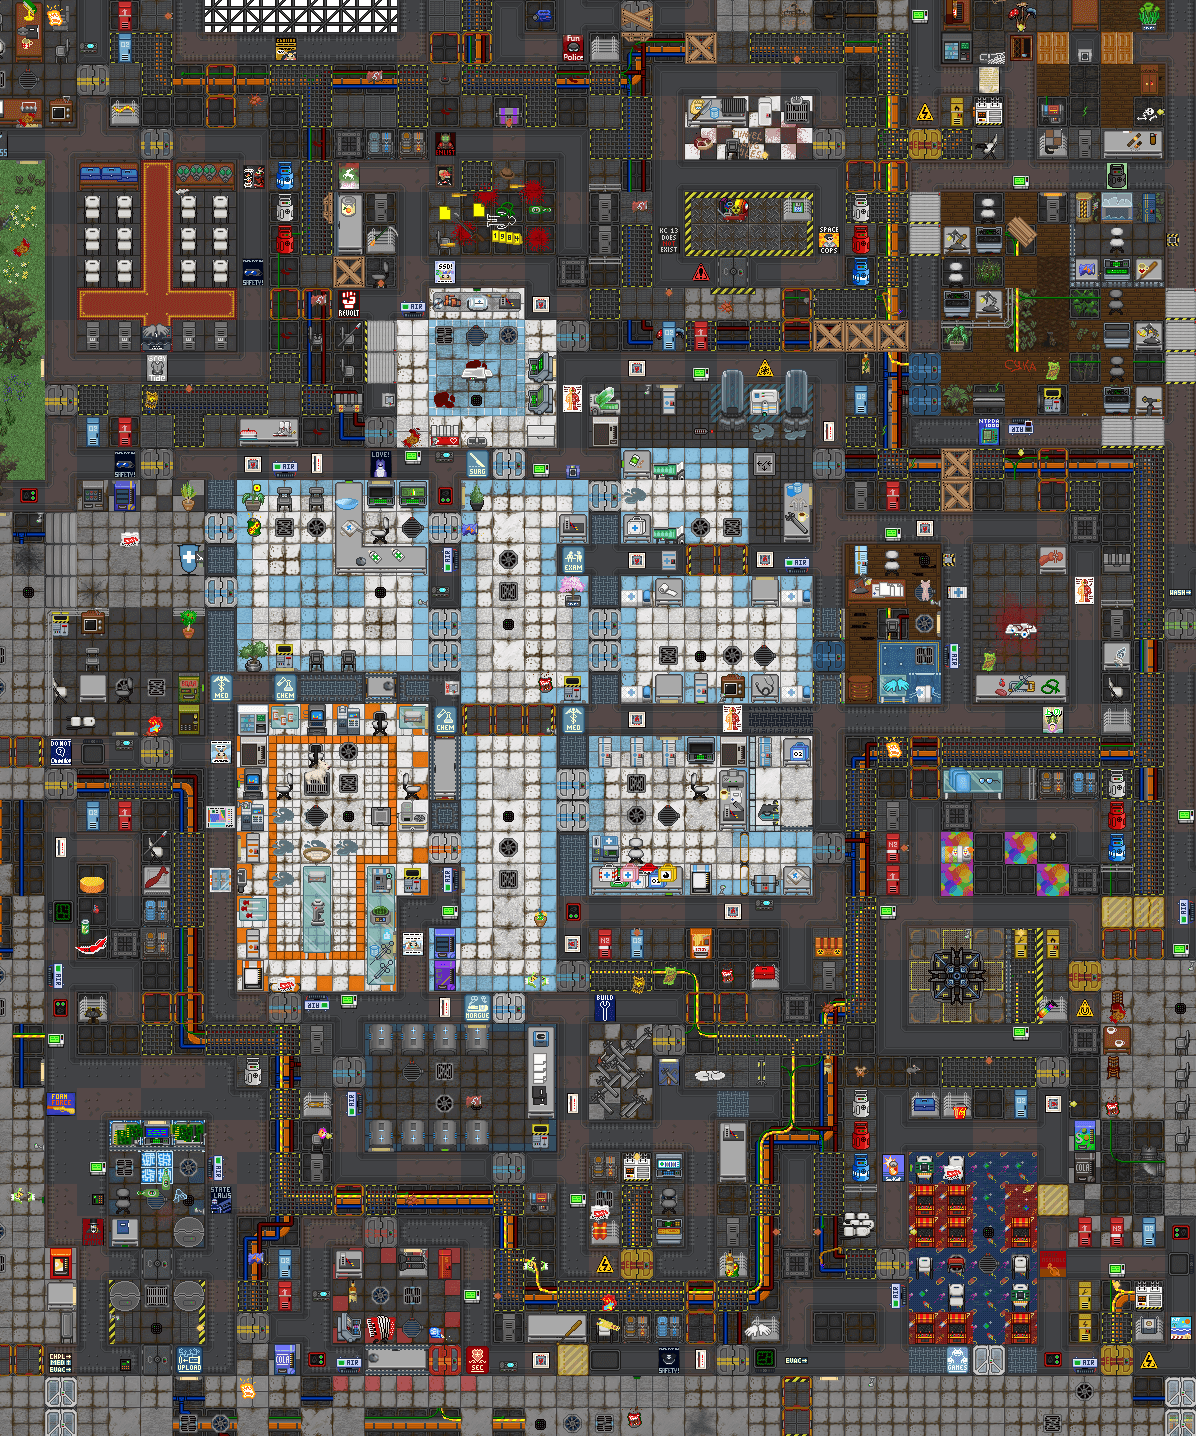
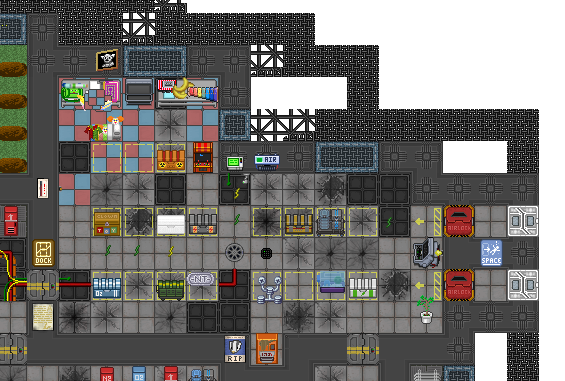
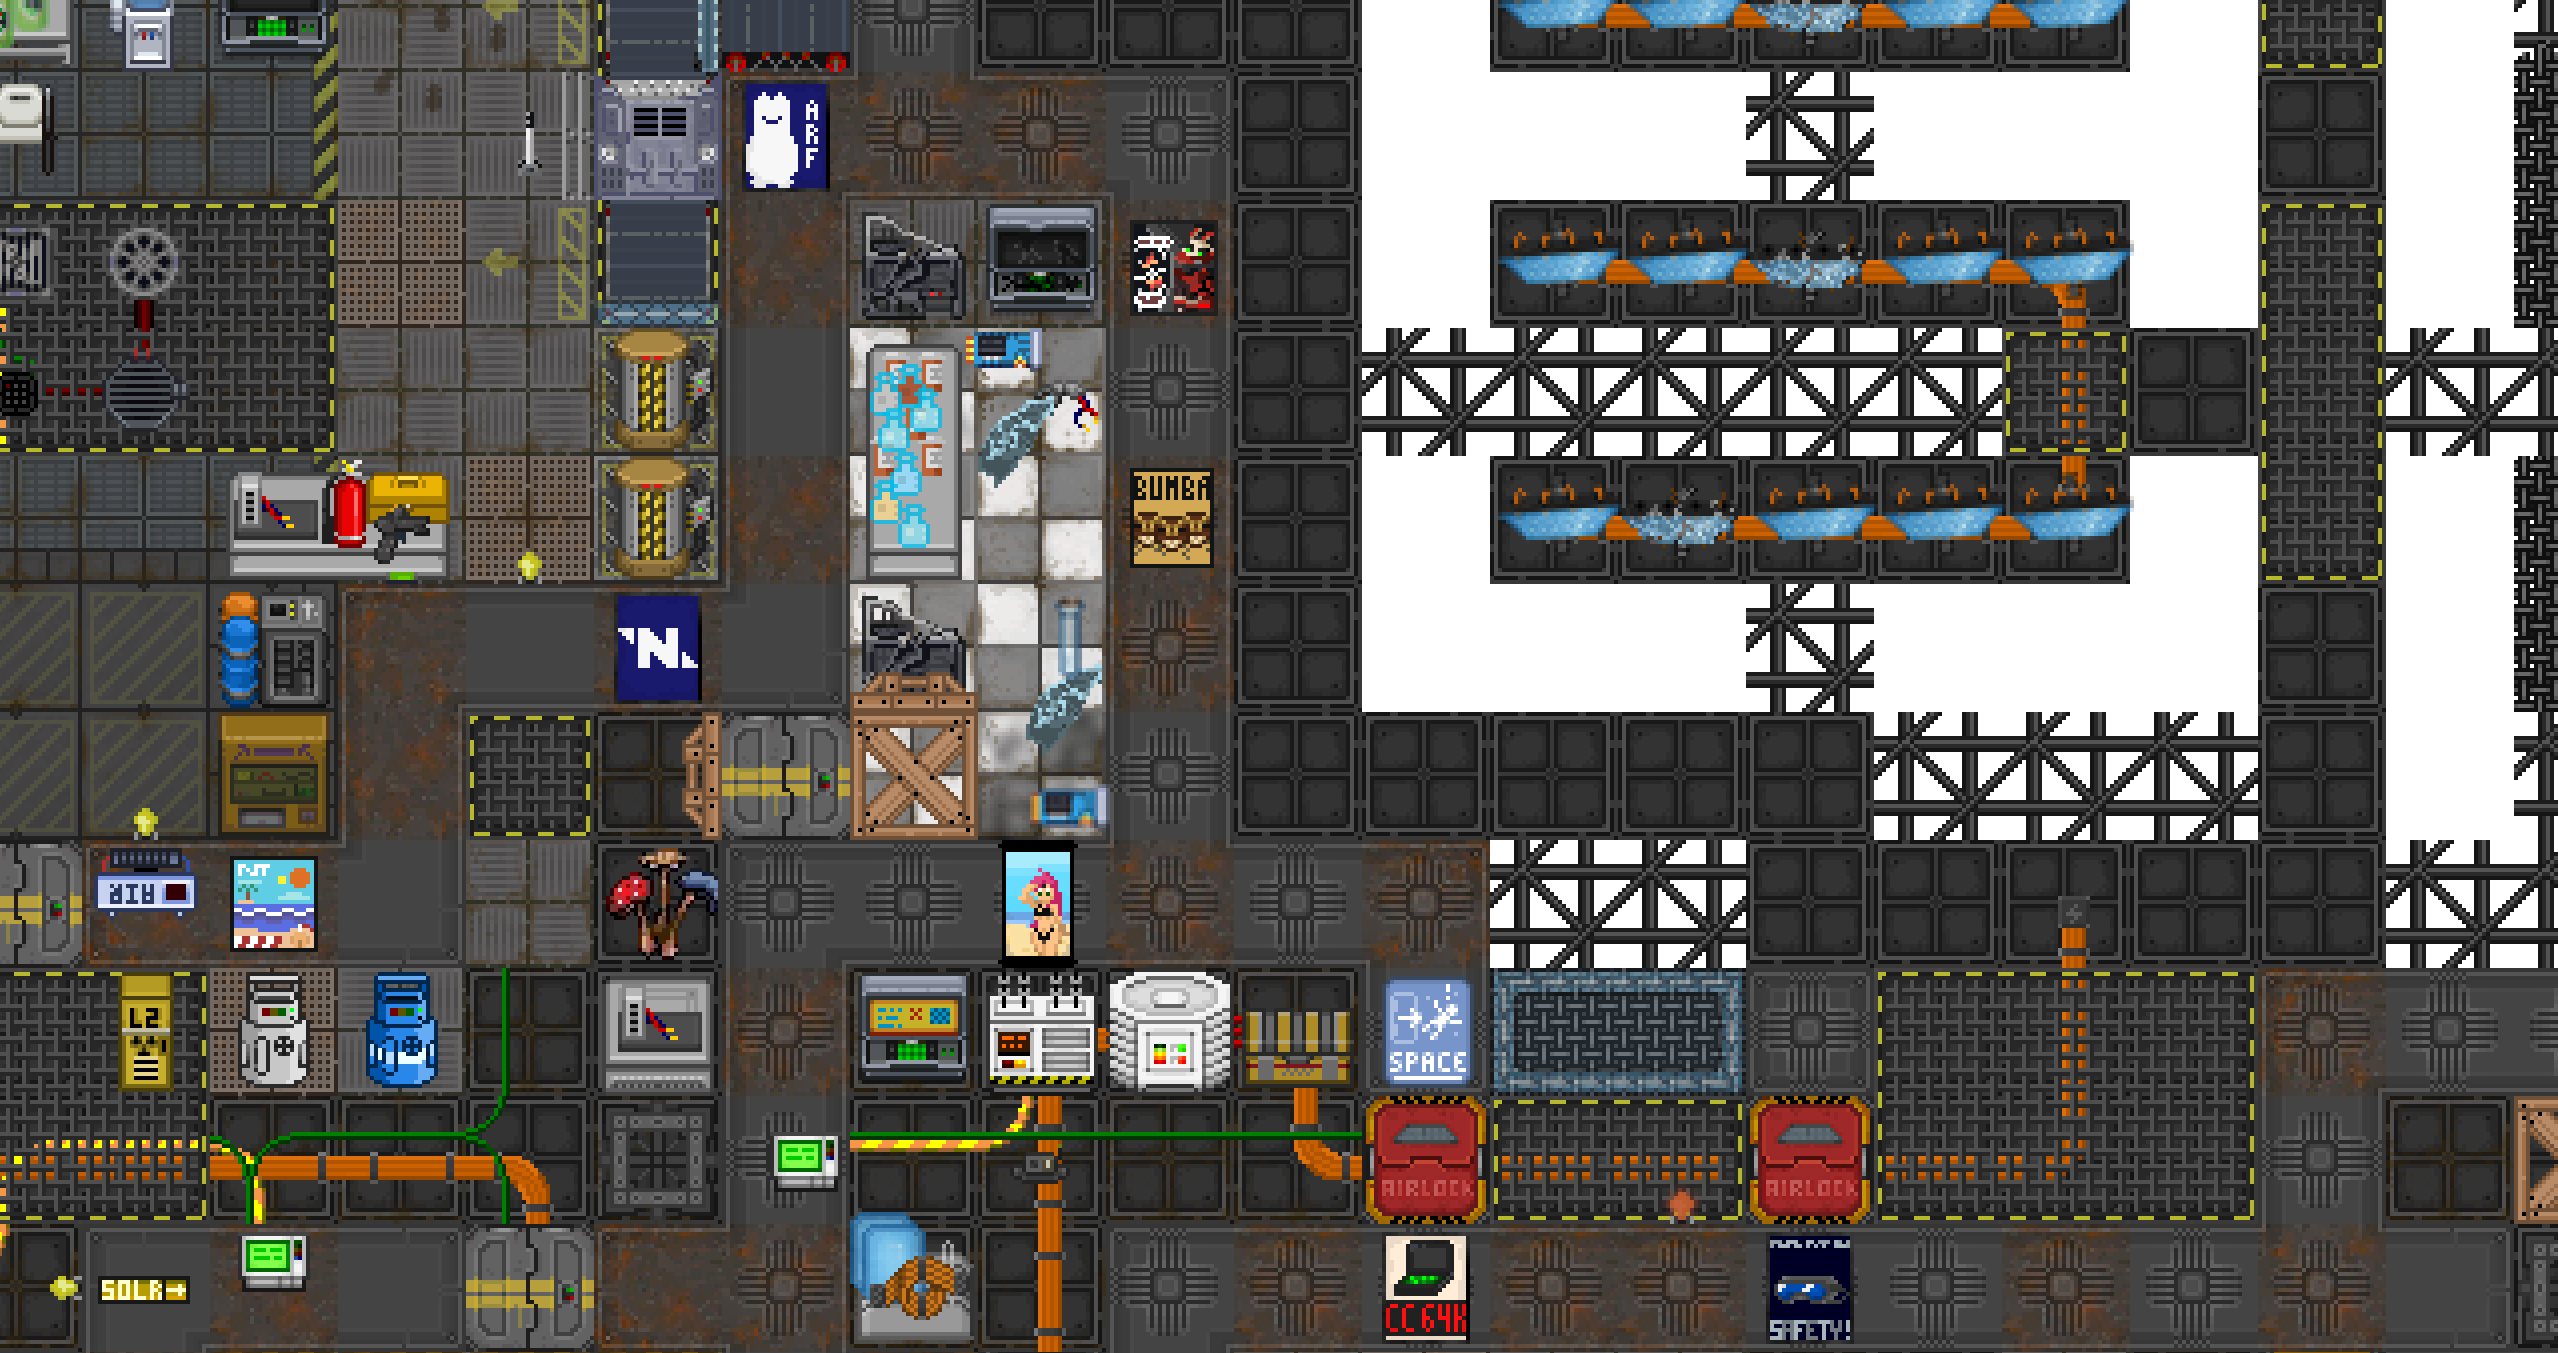
[EXAMPLE IMAGE: Annotated Station Map with Maintenance Network]
This is a well-designed maintenance layout. It contains a balance of voids and tumors, with multiple entry points into departments and hallways. The small yellow arrows indicate department connections, while the larger ones represent general hallway links. This ensures strong traversal and escape routes across the station.
Color key: Dark Blue - Bridge and AI Core (including chute); Pink - Science; Red - Security; Orange - GenPop/Brig; Green - Service; Cyan - Medical including Virology; Yellow - Engineering.
The dotted yellow lines show the actual traversable paths within maintenance. Notice how they thread through and around most of the station’s departments, providing options without cluttering the design.
The Shape of Good Maintenance
To better structure maintenance, some mappers- particularly CrimsonJupiter - introduced a helpful mental model: Tunnels, Voids, and Tumors.
- Tunnels are your core corridors. These should bend, split, and intersect. A 1-tile straight tunnel is fine briefly, but it shouldn't be your default.
- Voids are small rooms that lean against departments. They feel like spaces maintenance workers once used. A lounge, a workshop, a locker room. These give your tunnels texture and a sense of history.
- Tumors are outgrowths: large extensions that stick out into unused space. These can house themed rooms or antagonist activity zones. They make your station silhouette interesting on scanners, but too many tumors can bloat your map and hurt travel flow.
This system isn’t a checklist, but a lens. If your maintenance is all tunnels, it’s dull. If it’s all tumors, it’s confusing. Balance them.
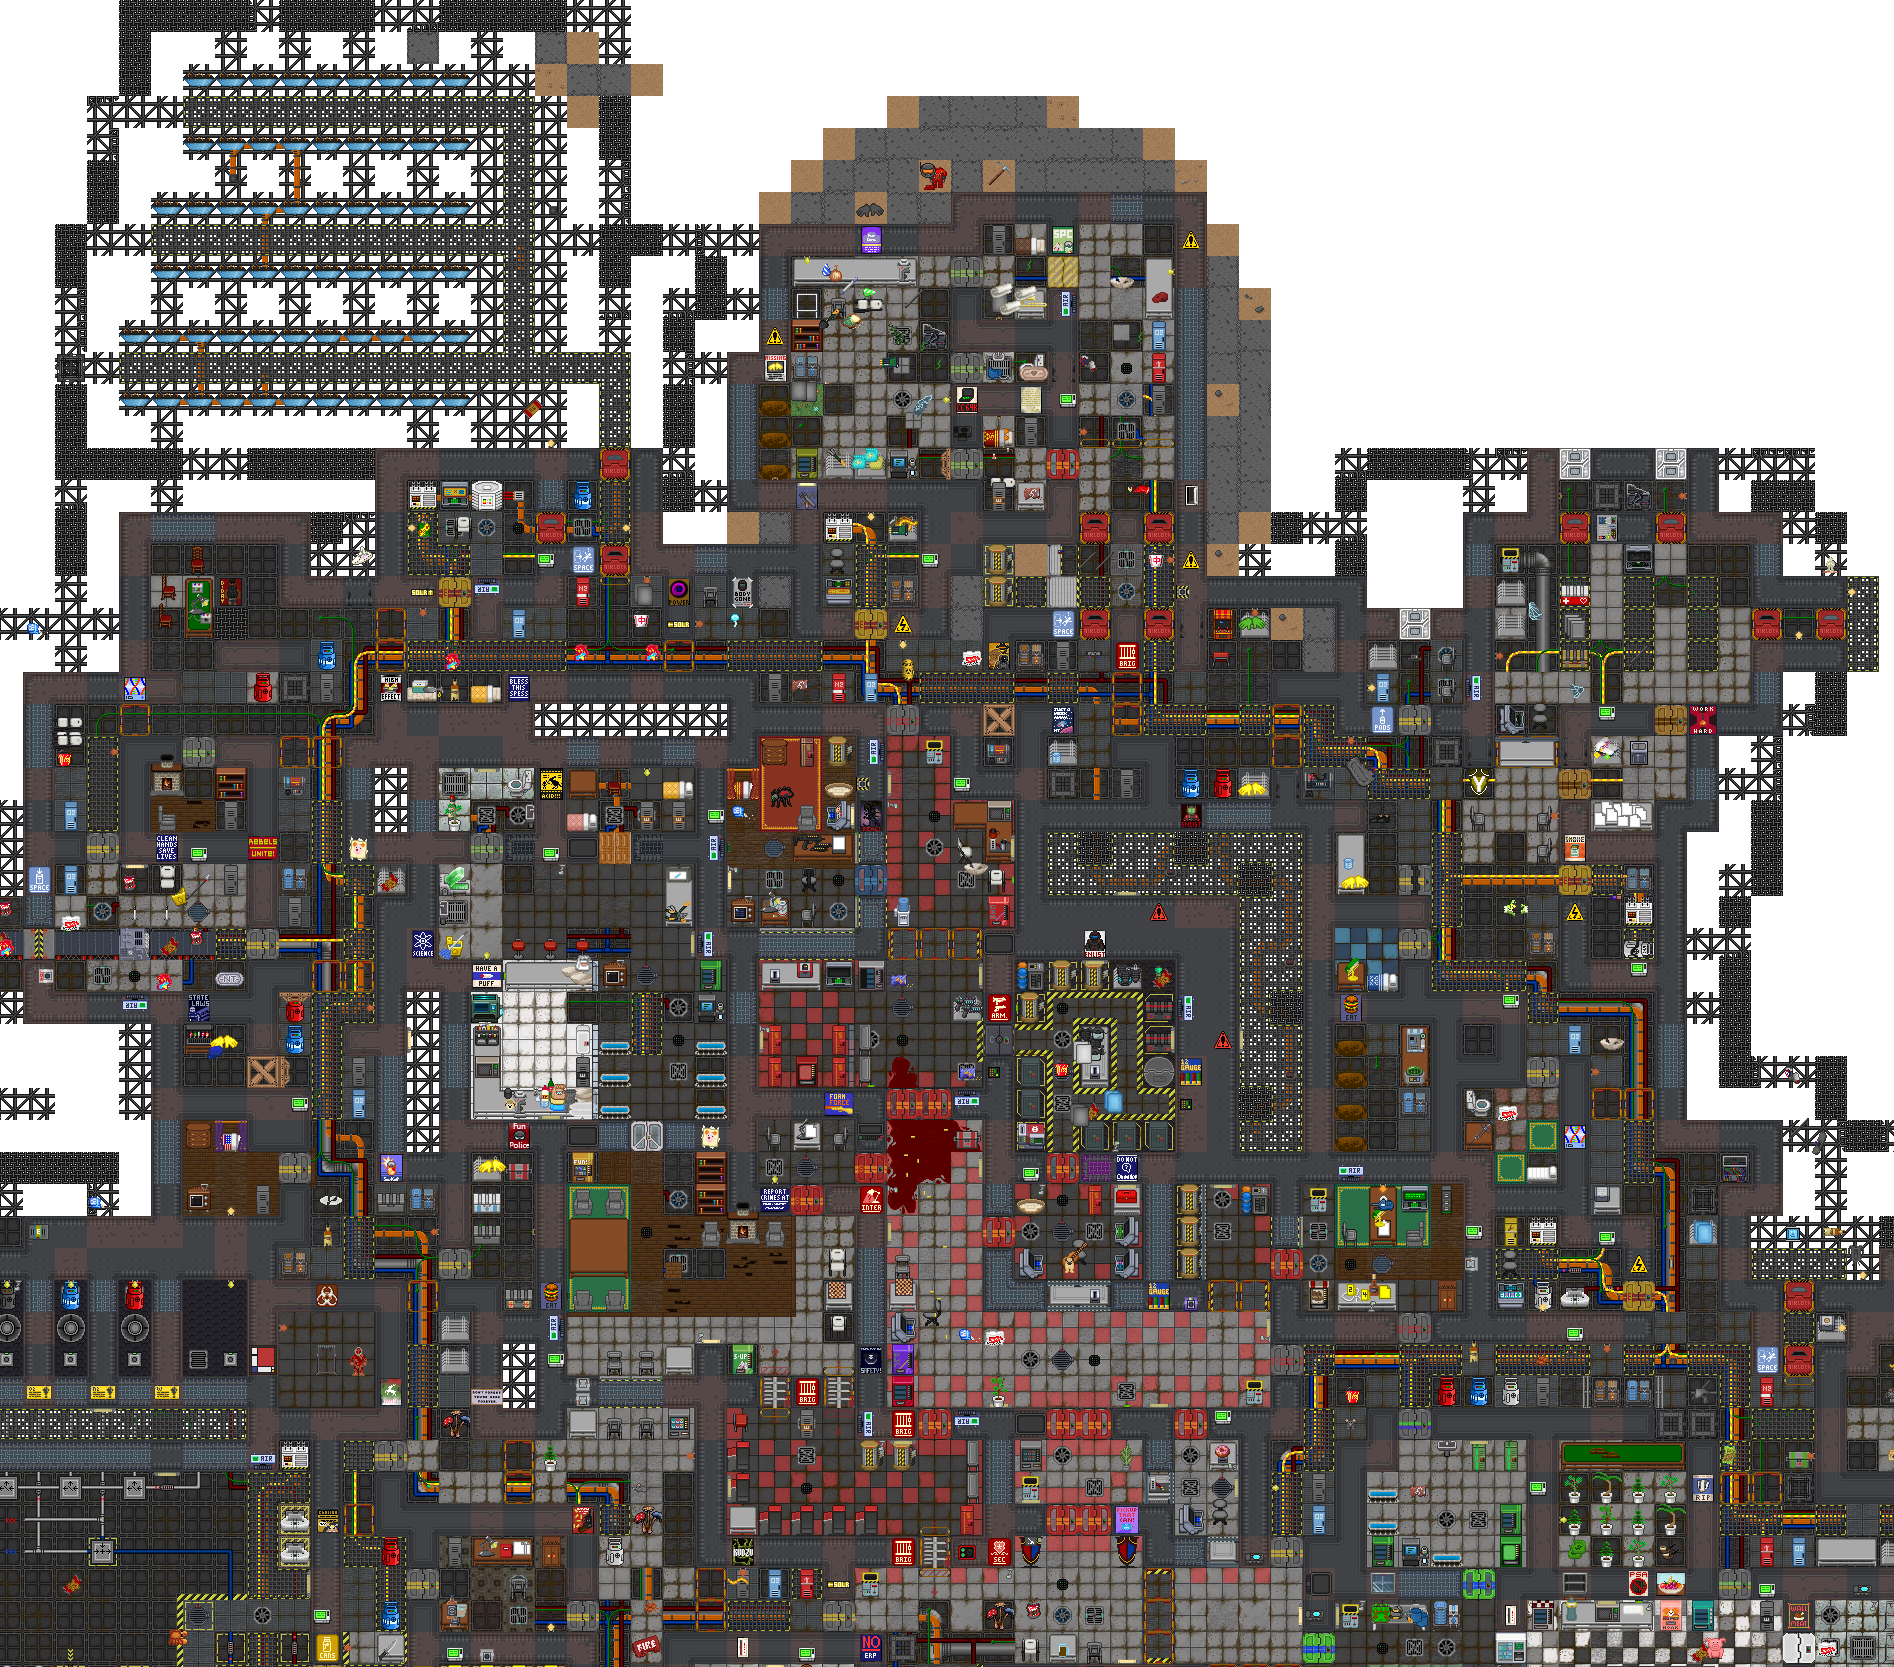
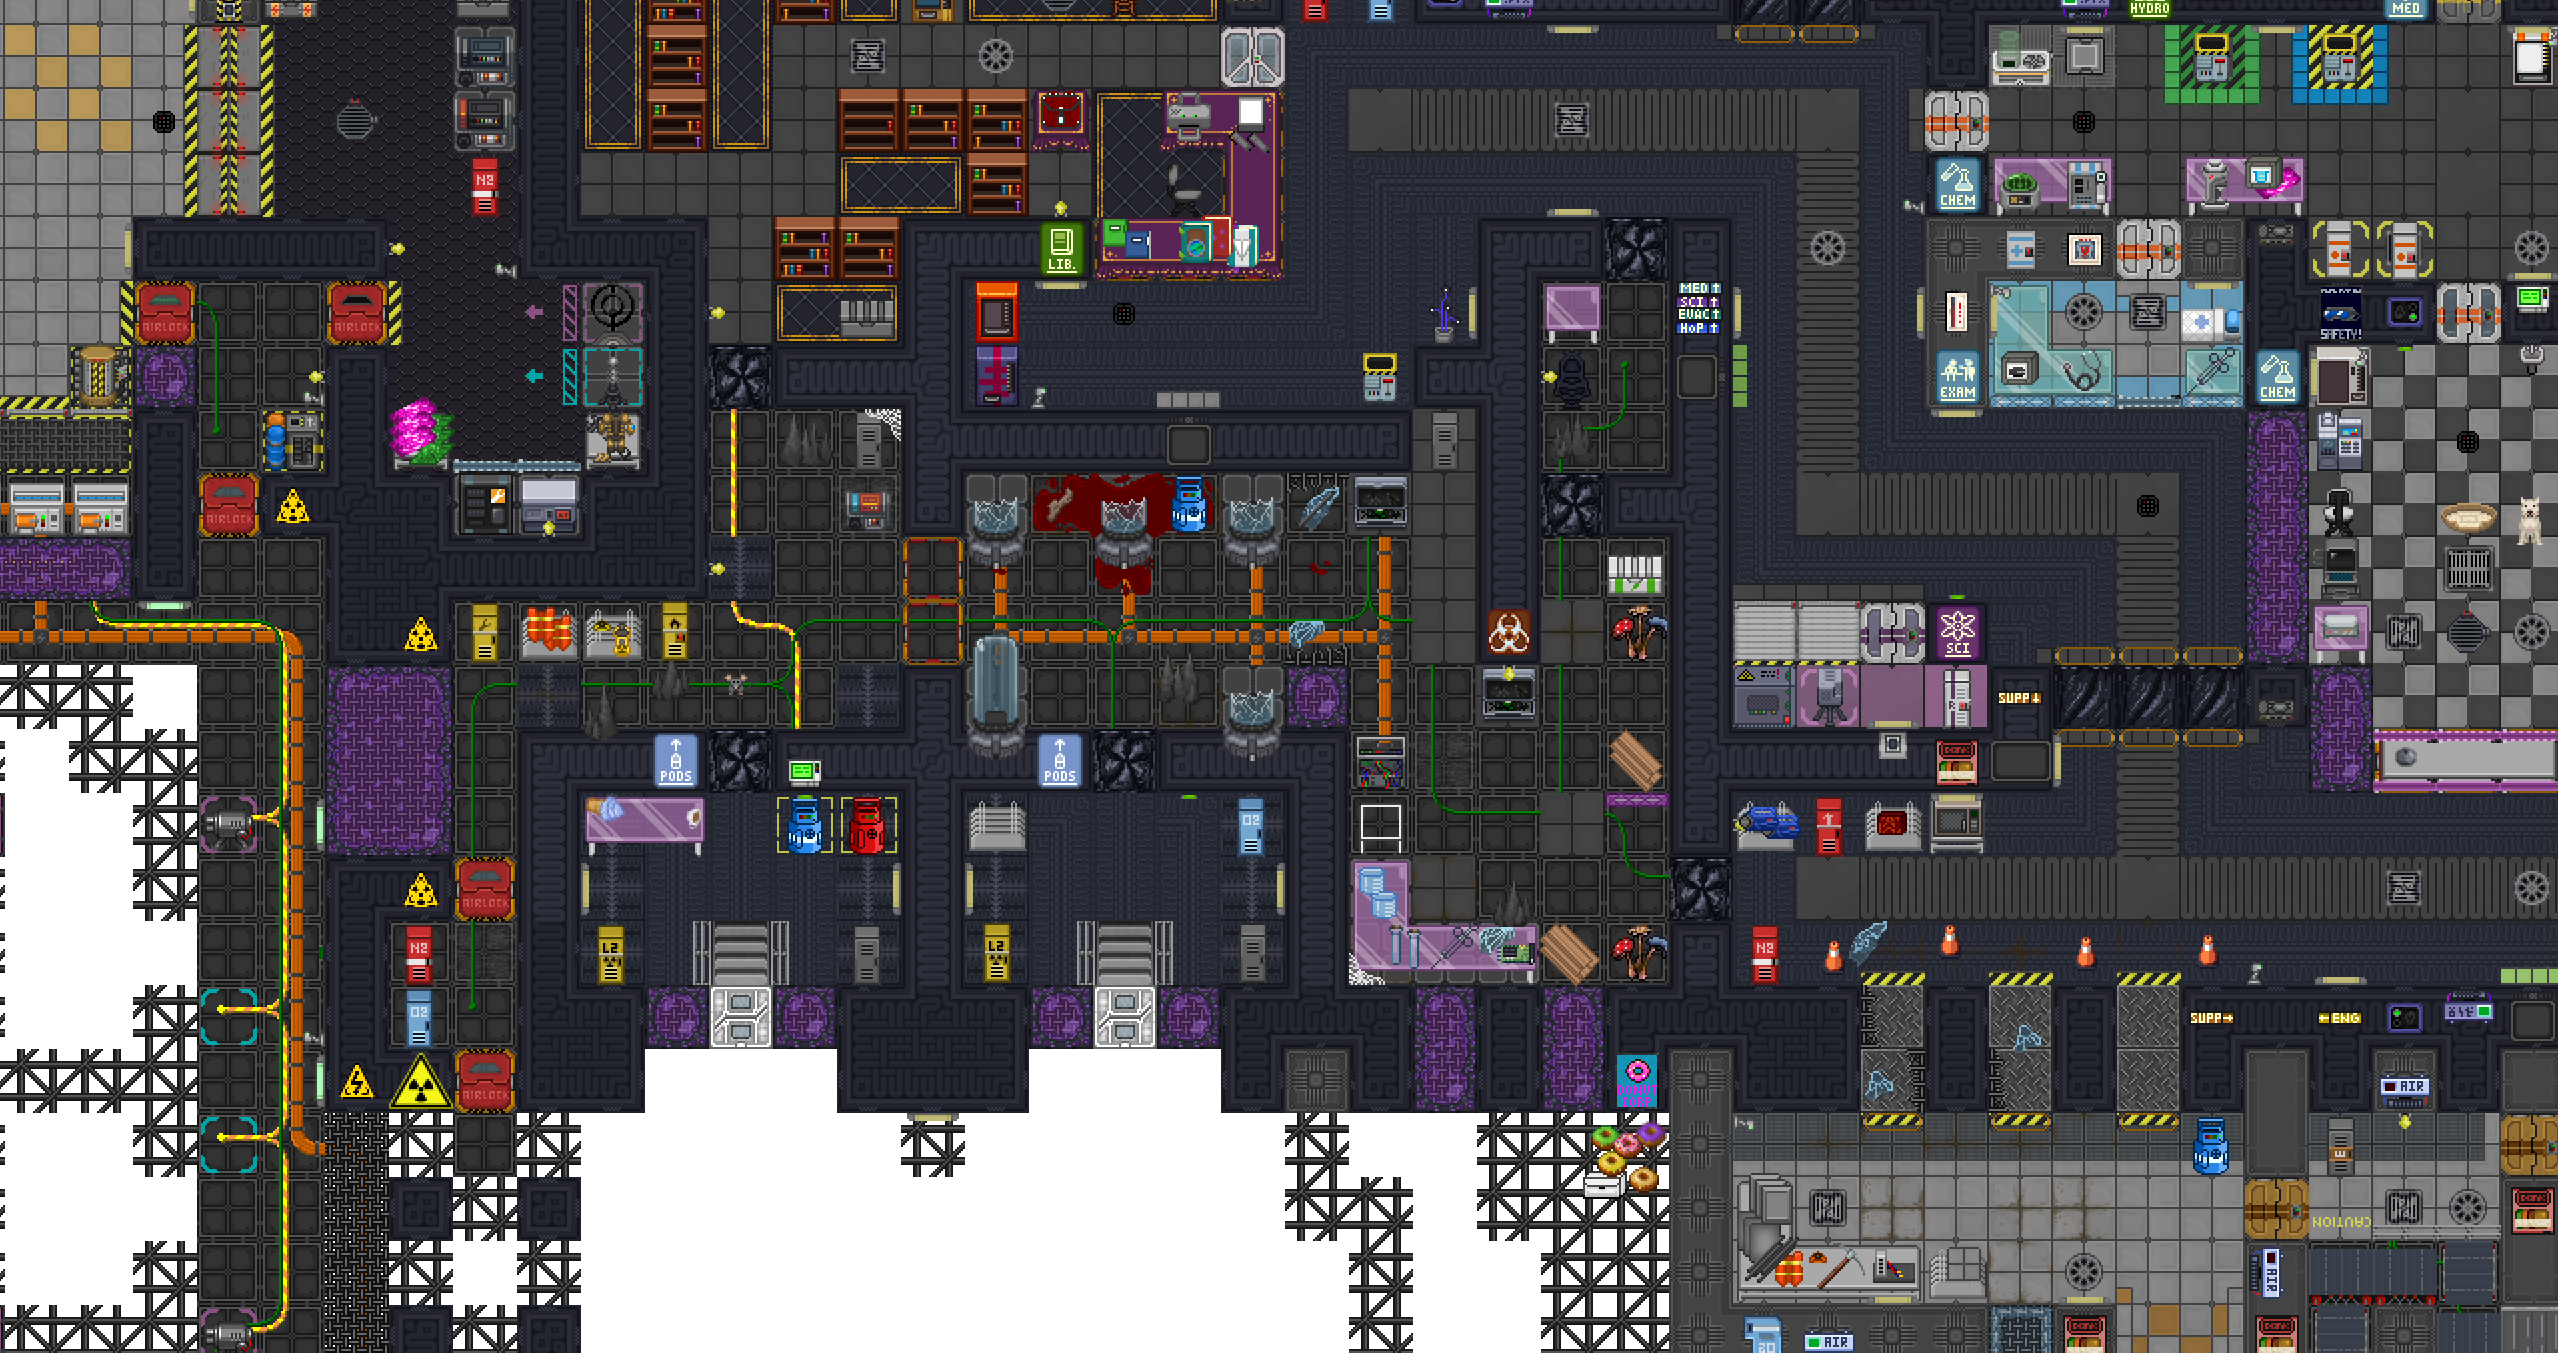
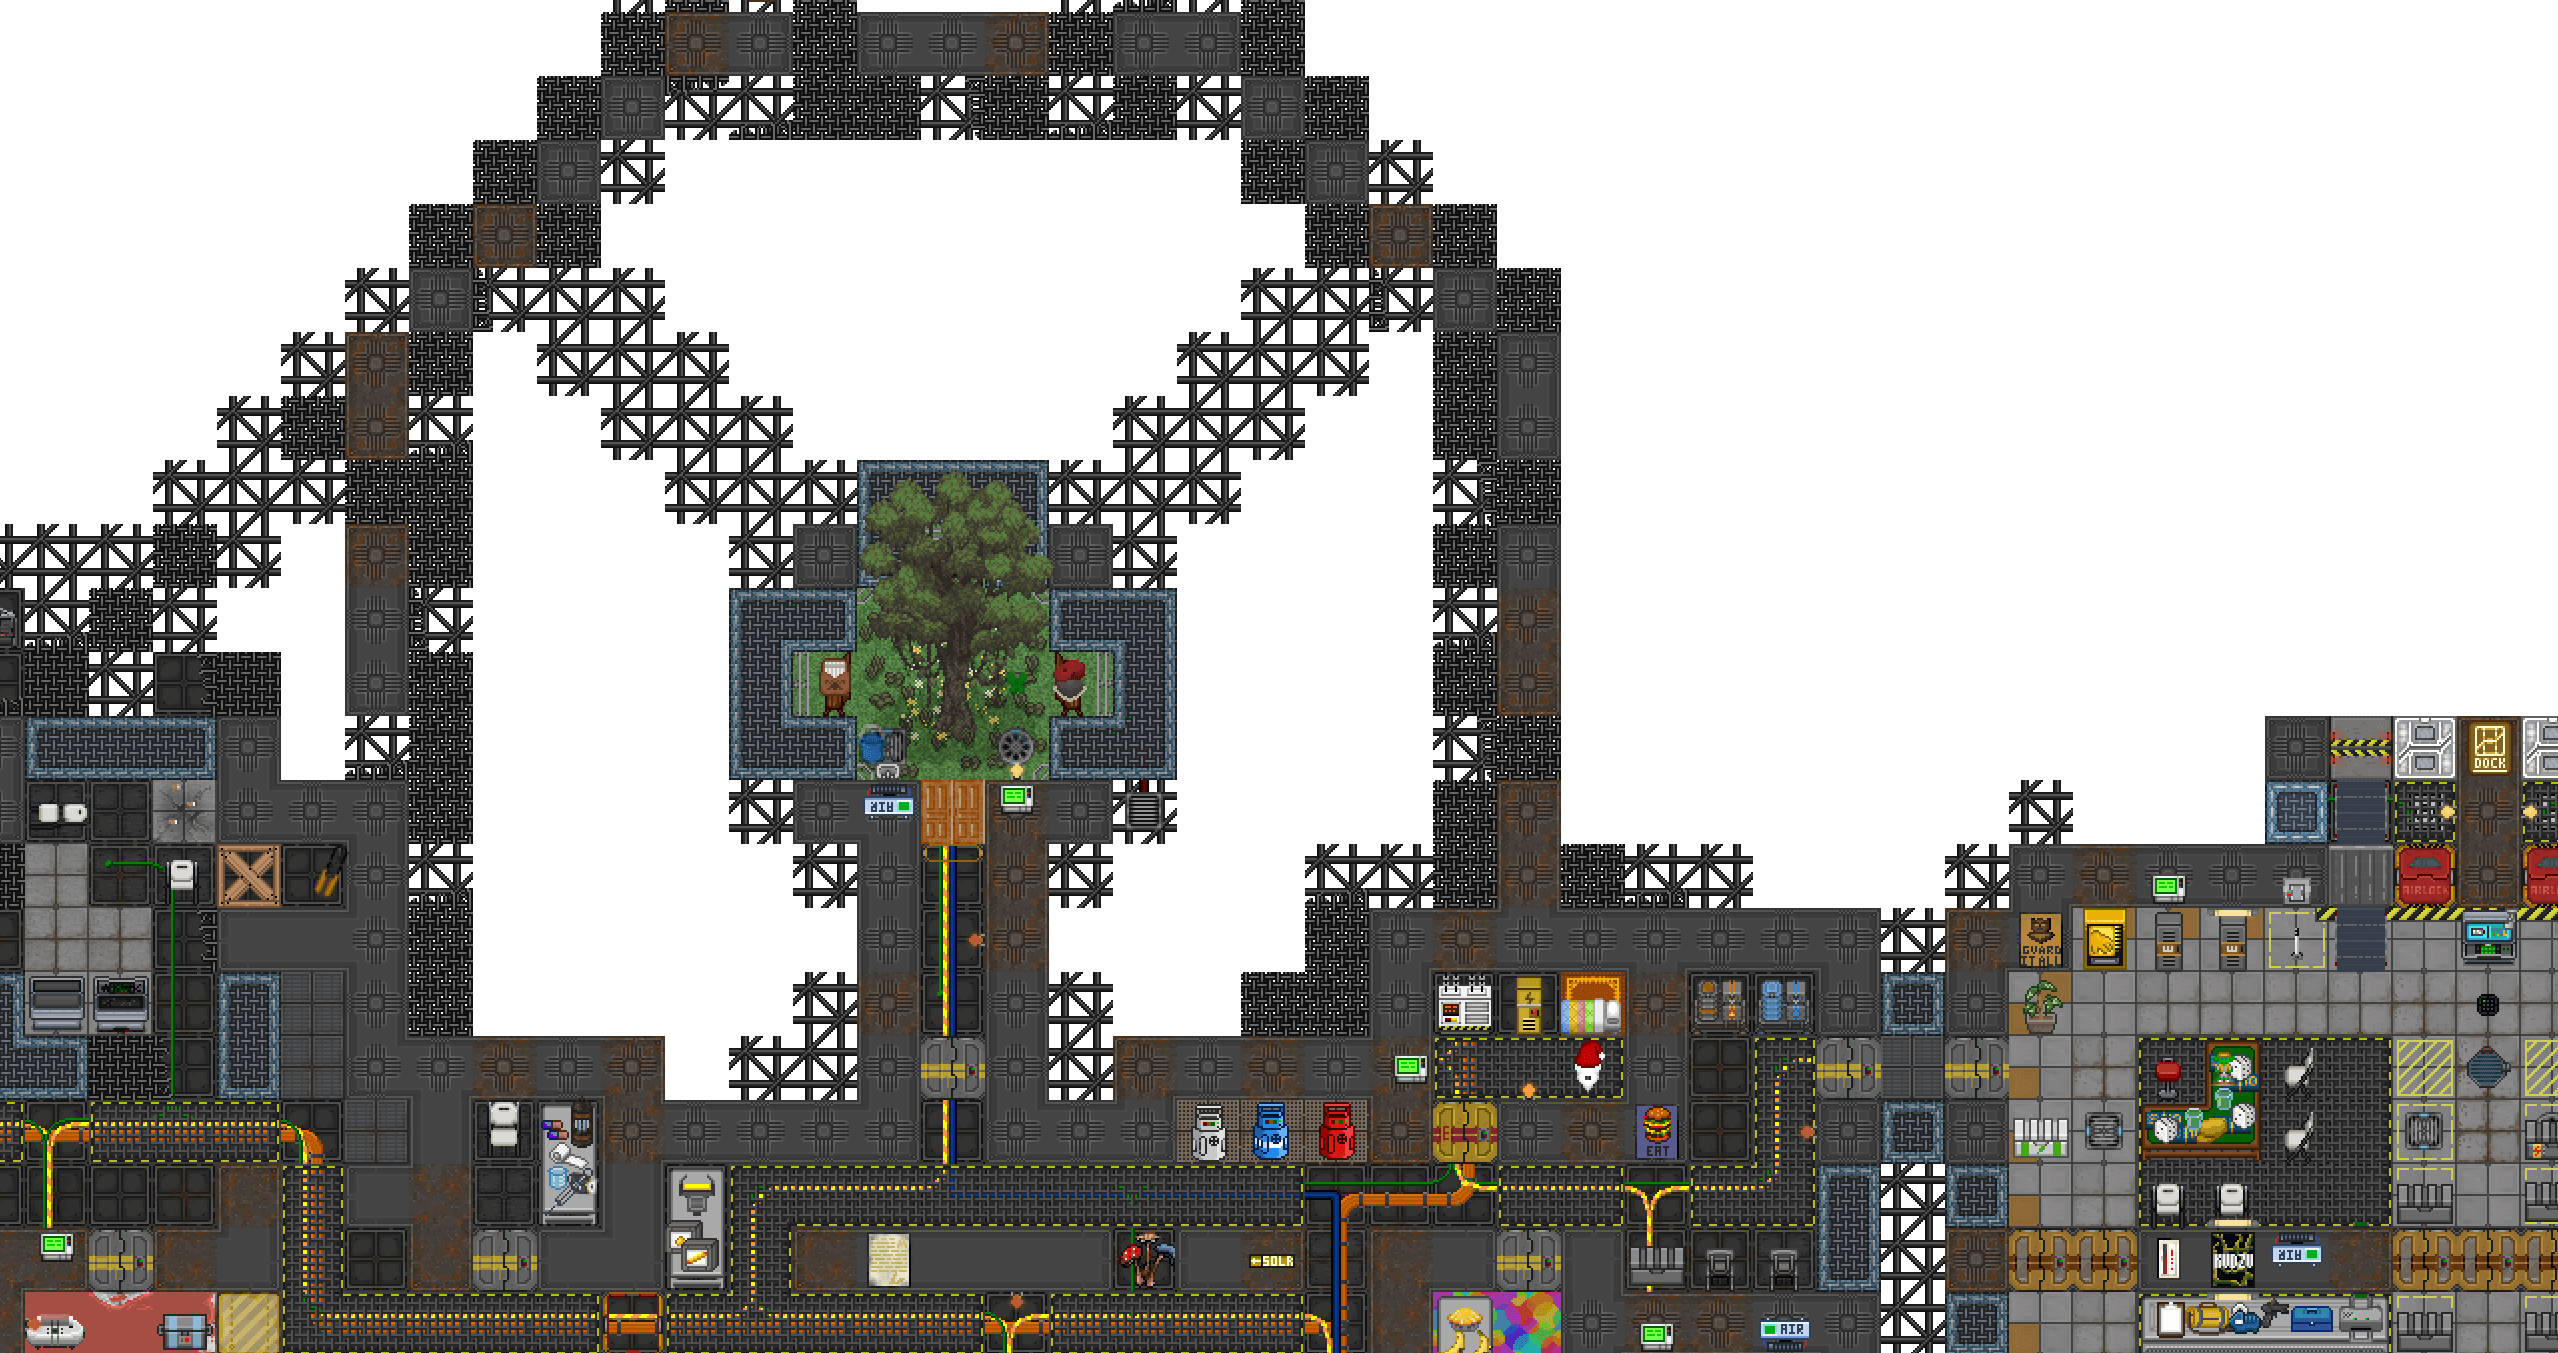
[EXAMPLE IMAGE: Annotated map showing tunnels (yellow), voids (red), tumors (blue)]
The word “tumor” in this guide refers to organic, irregular outgrowths from the main body of the station. These add character and variety to the layout. The term is purely structural, not judgmental. It does not imply something harmful or unwanted. Tumors, when used intentionally, are powerful tools in shaping dynamic and believable station maps.
Tension Through Layout
One of maintenance’s strengths is that it introduces risk. In a well-lit hallway, you can see everything. In maintenance, you don’t know what’s waiting. That’s by design.
Curves and corners are powerful tools. They break sightlines. They make you listen instead of just look. Add a side passage here, a bend there, a broken and dim lights, and suddenly the space feels alive, even if no one’s in it.
A good maintenance layout will make you pause. A bad one lets you sprint from one end to the other without a second thought.
[EXAMPLE IMAGE: Before/after tunnel layout with improved curves, cover, or decision points]
Player Expression in Forgotten Spaces
Maintenance isn’t just for fleeing antags. It’s also where bored crewmembers turn junk into community.
Across SS14, you’ll find stations with unofficial “Maintenance Bars,” gaming rooms, shrines, and weird art projects, because maintenance has no owner. That’s its magic.
Even if these areas go untouched for ten shifts, the possibility invites interaction.
[EXAMPLE IMAGE: Maints bar or repurposed room with sandbox elements: bar stools, dartboard, food/drinks]
Scavenging and Surprise
Maintenance should reward exploration without unbalancing the game. Place loot with intent. Keep oxygen tanks and toolboxes accessible, but hidden. Make a player feel clever for finding something, not lucky.
Don’t drop full loot tables into empty rooms. Instead, tuck small rewards into corners, behind doors, or inside voids that suggest they’ve been used before.
Maintenance should have tools, not treasure.
[EXAMPLE IMAGE: Smart loot placement in a tucked-away void with visual storytelling elements]
Integrating Maintenance into Station Layout
Maintenance isn’t frosting on a cake. It’s in the batter. If you bolt it on last, you’ll miss opportunities to make it useful.
Map it alongside the departments. Let it weave around them, not just border them. Think about where someone might run, where a nukie might plant their bomb, or where a traitor might stash a body.
Every department should have at least one maintenance-adjacent space. Not all should be accessible, but all should feel close. Doors that can be hacked or blown open. Windows to be broken. Cables to be cut.
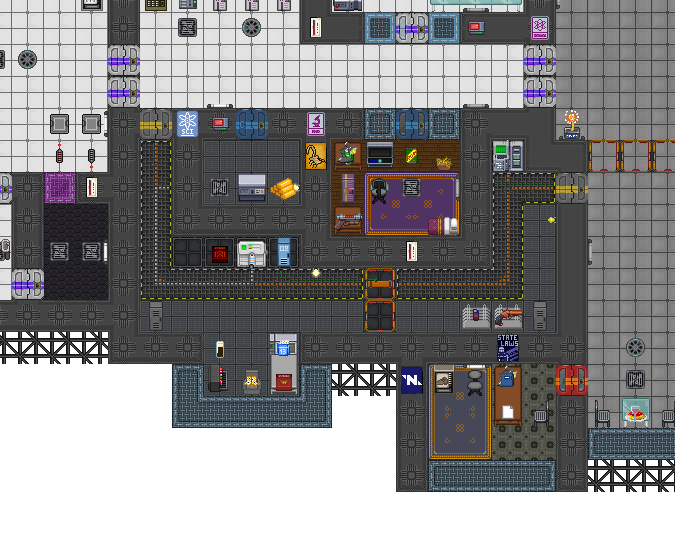
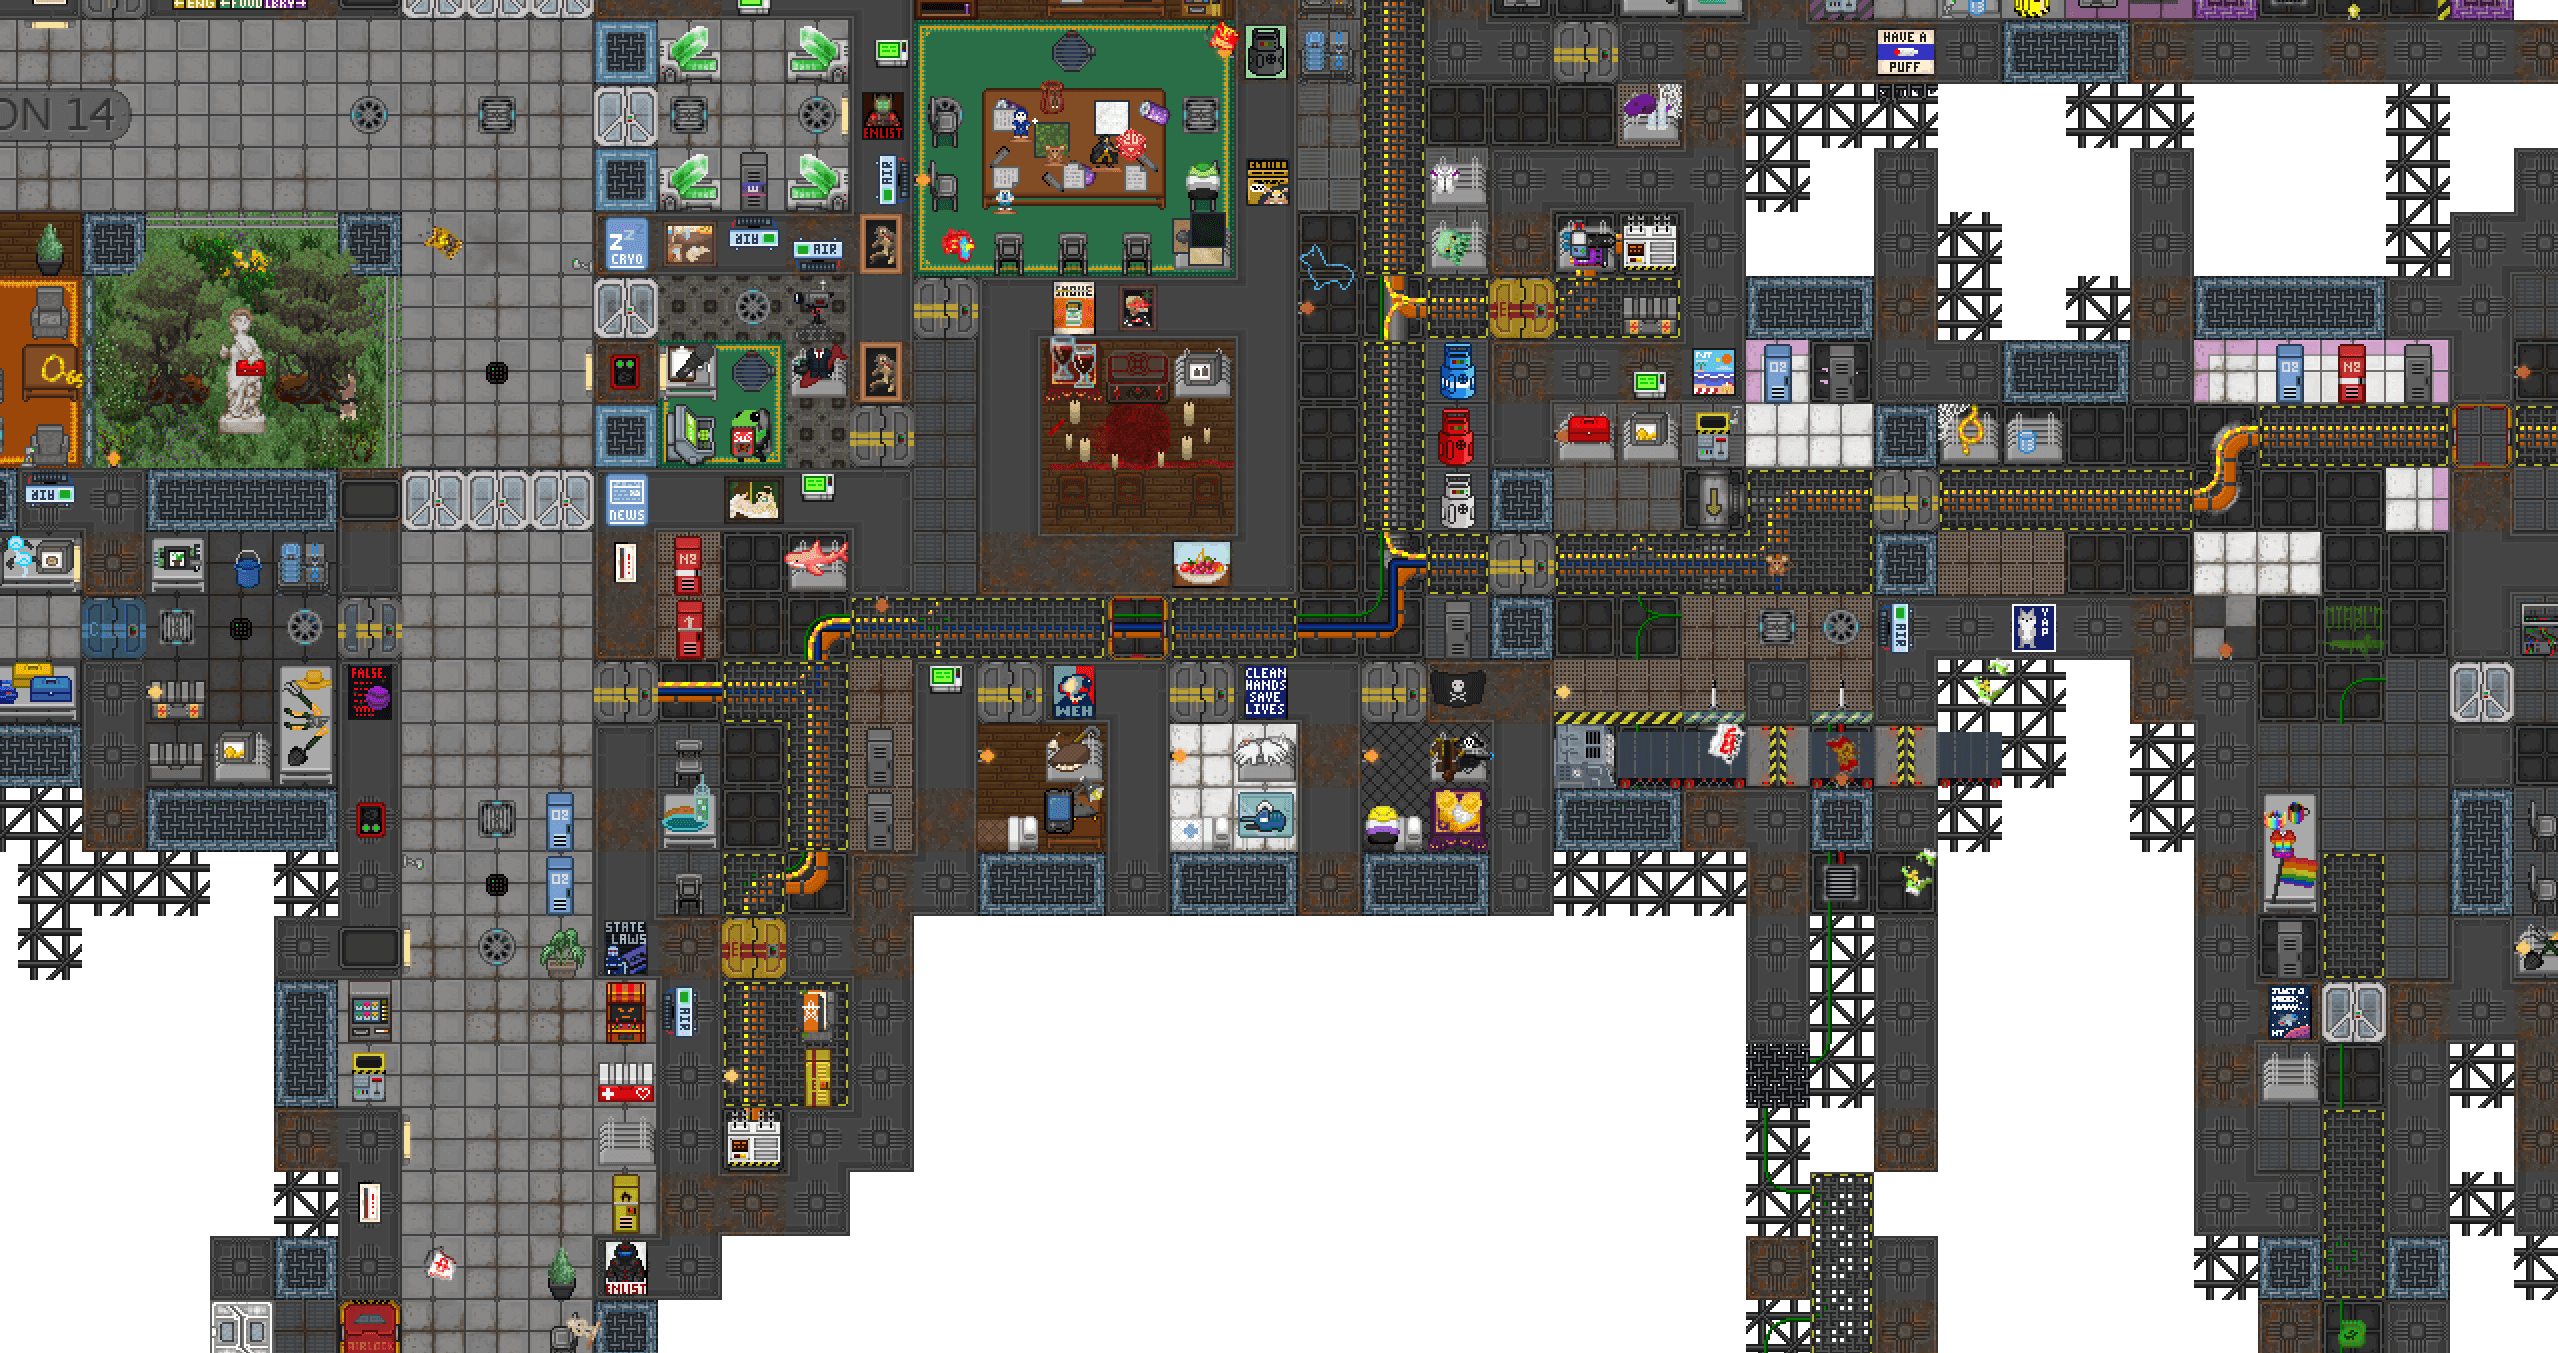
[EXAMPLE IMAGE: An example where medbay is flanked by maints, allowing multiple escape and attack options]
A Word on Aesthetics
Maintenance should feel lived in, but also neglected. Use that tension. Don’t be afraid of:
- Rust decals
- Broken and dim lights
- Graffiti
- Old signs or incomplete markings
- Mess and clutter
Players will remember a room they don't want to enter more than one they walk through in silence.
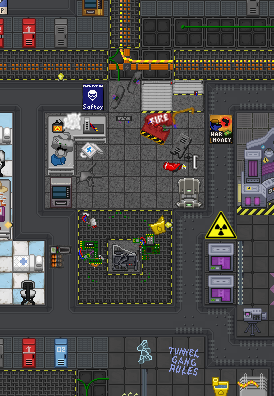
[EXAMPLE IMAGE: Strong visual theming in a forgotten corner, broken and/or dim light, weird messages, damaged floor]
Example Maintenance Rooms
Maintenance isn't just a hallway. The best stations use it to tell stories and support side roles, sandbox building, or engineer work. Below are examples of themed maintenance rooms that serve aesthetic, narrative, and gameplay functions. These areas may or may not be used every round, but when they are, they become memorable.
1. Abandoned Break Room
A small seating area with rusting tables, broken and dim lights, and some vending machines. Add broken computers, a shattered window, maybe a forgotten note or bloodstain. This feels like a place that mattered once, then didn't.
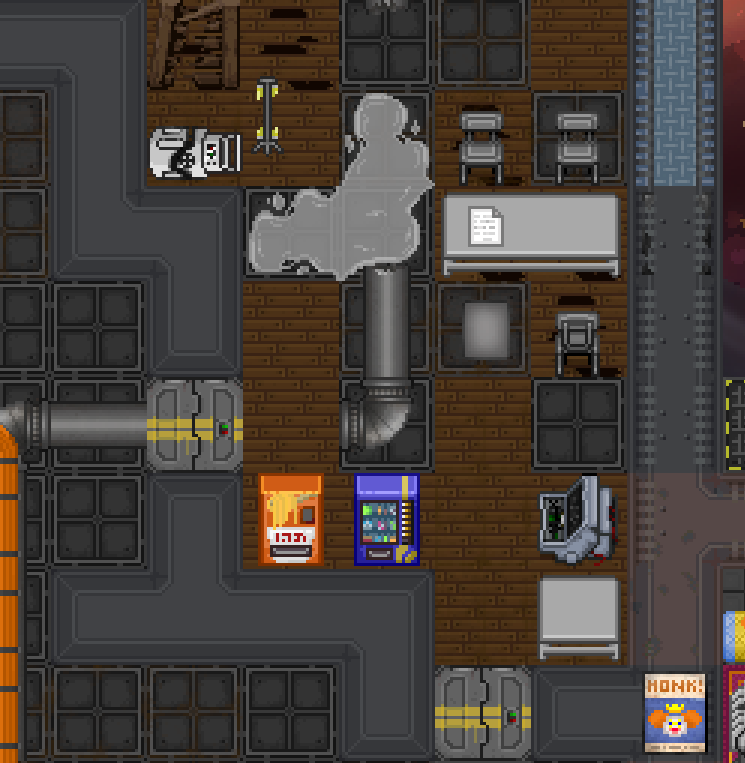
[EXAMPLE IMAGE: Placeholder for abandoned break room]
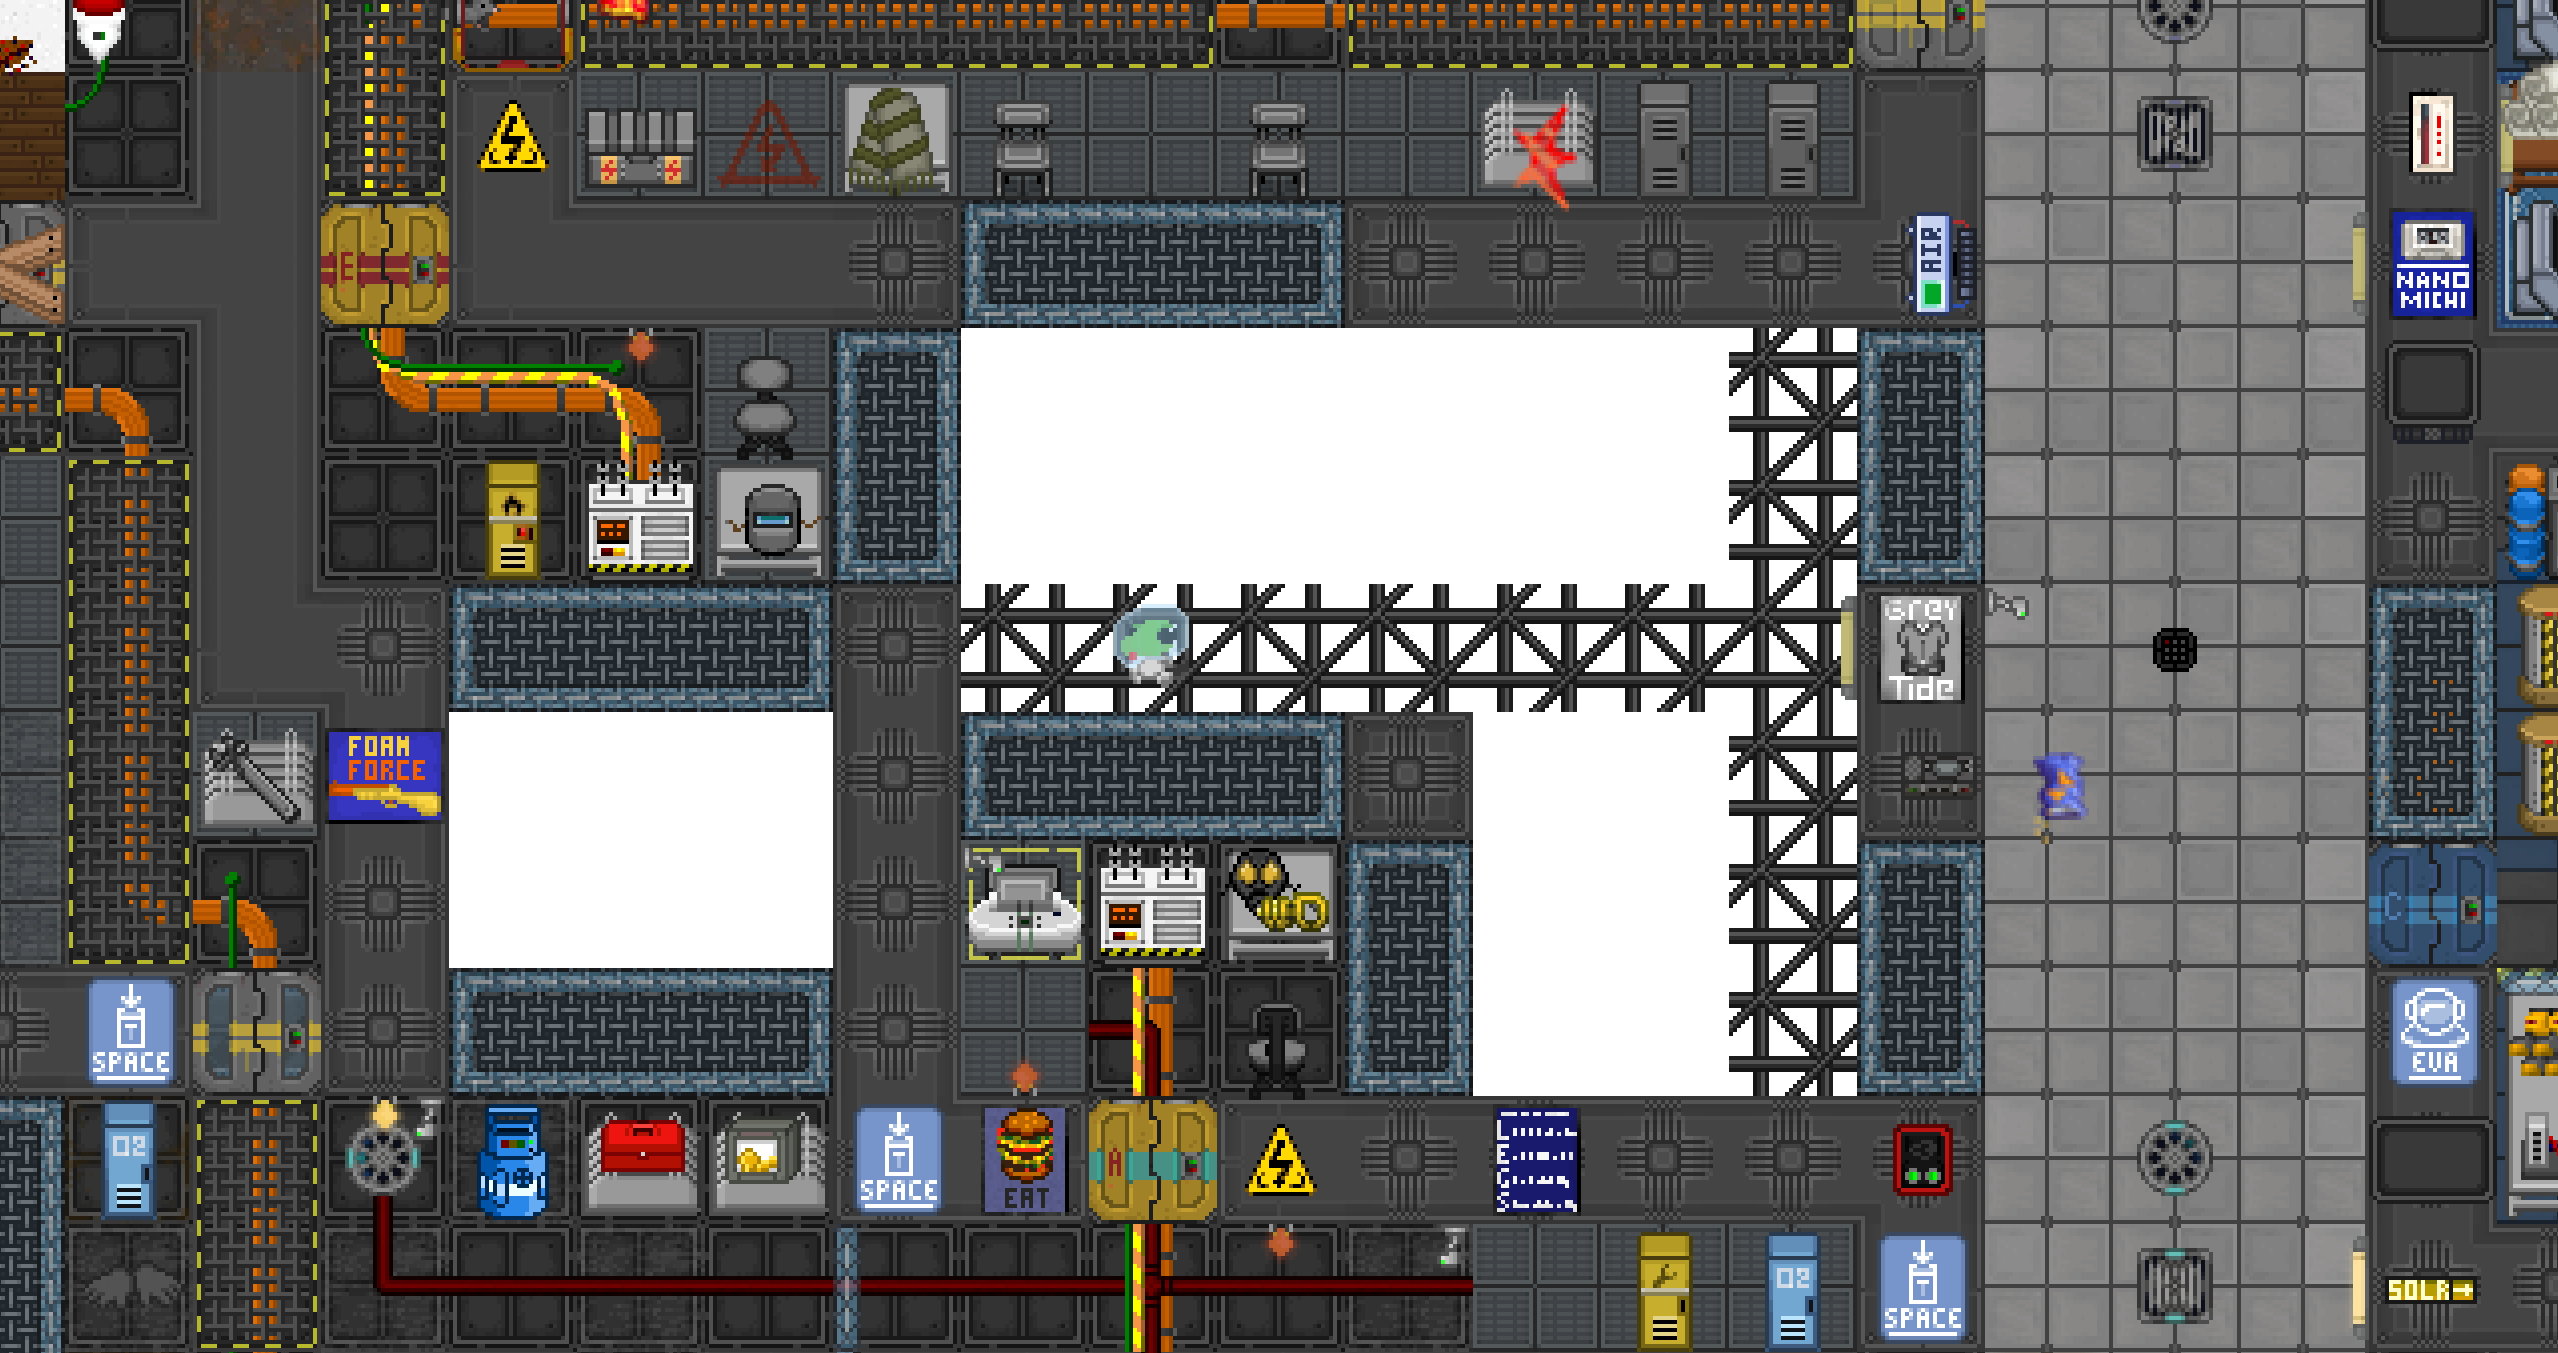
2. Electrical Substation
A proper utility room with exposed cables, a backup SMES or APC, and tools for engineers. This supports maintenance’s functional role: Engineers use these spaces to restore power or sabotage systems. Include wiring messes, floor cables, and lockers.
[EXAMPLE IMAGE: Electrical rooms/Substations]
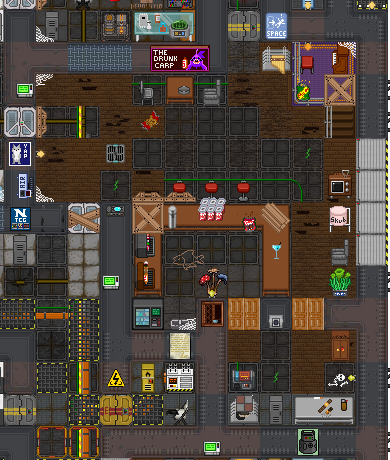
3. The Maintenance Bar
Tables, stools, a hacked vendor or fridge, and a sign with a funny name. This space exists to be claimed by bored assistants or roleplayers. It’s unofficial and always slightly janky, which is perfect.
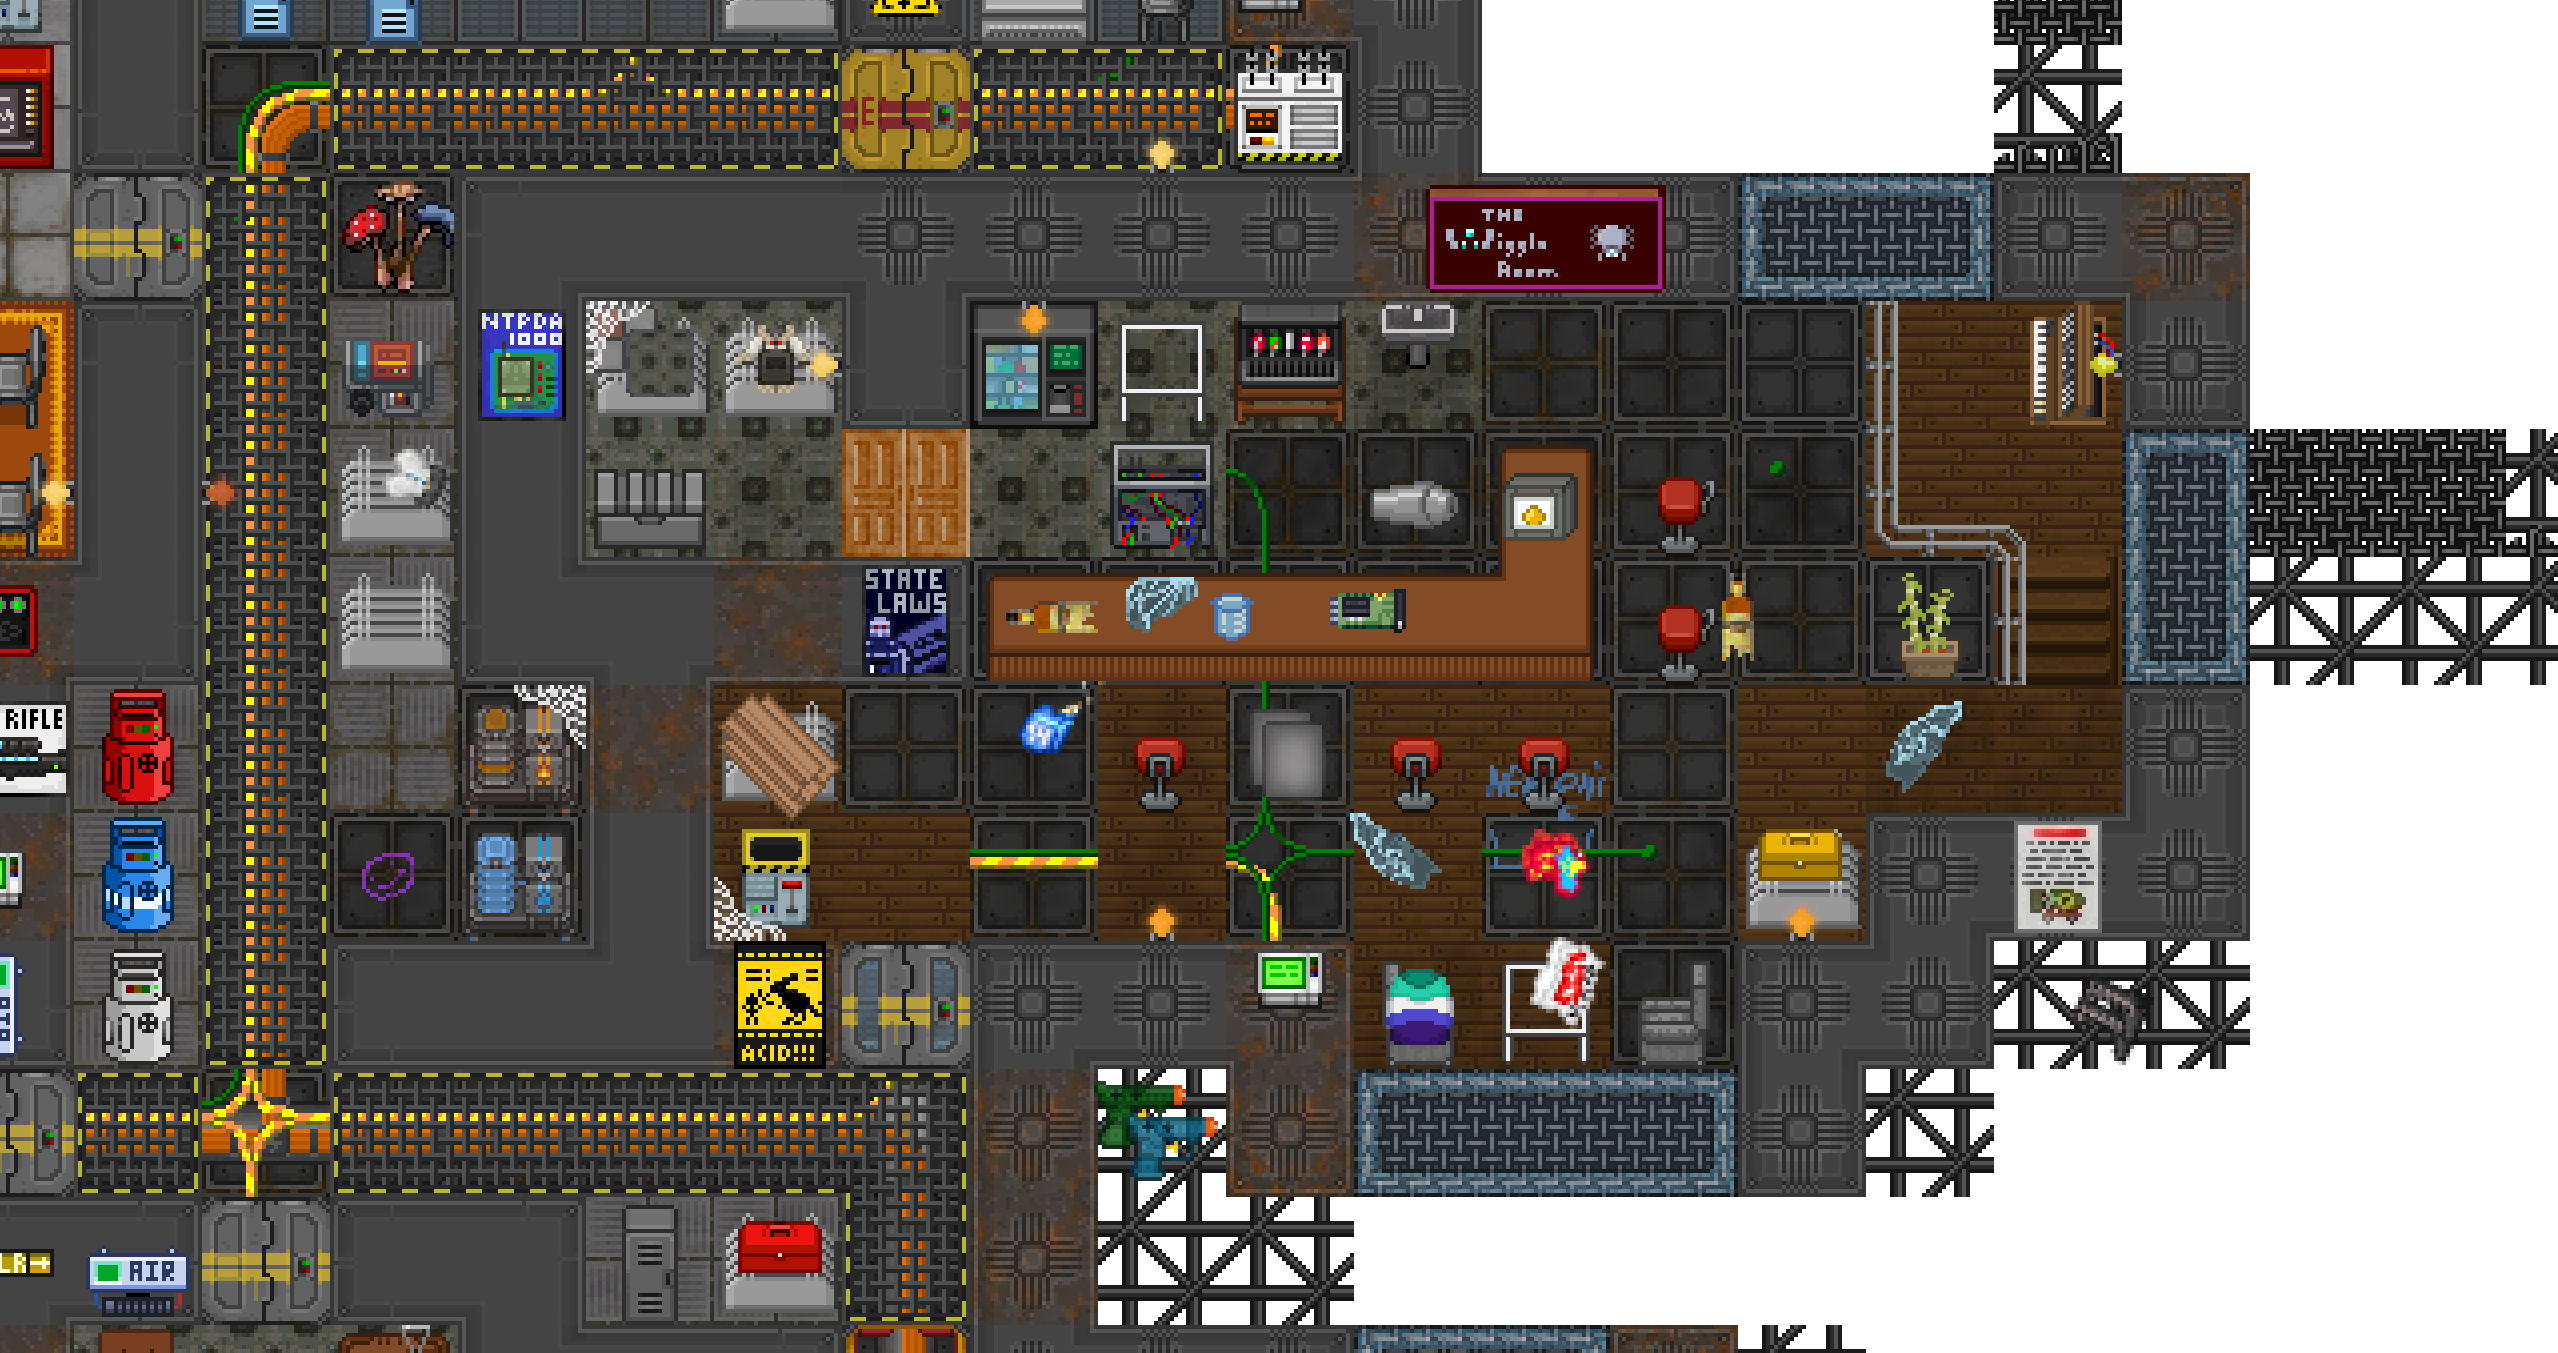
[EXAMPLE IMAGE: Maints Bar]
4. Atmospheric Utility Closet
A room with air canisters and masks. Sometimes players need a place to refill tanks or manage air flow. These help the station breathe.
[EXAMPLE IMAGE: Atmos maints room]
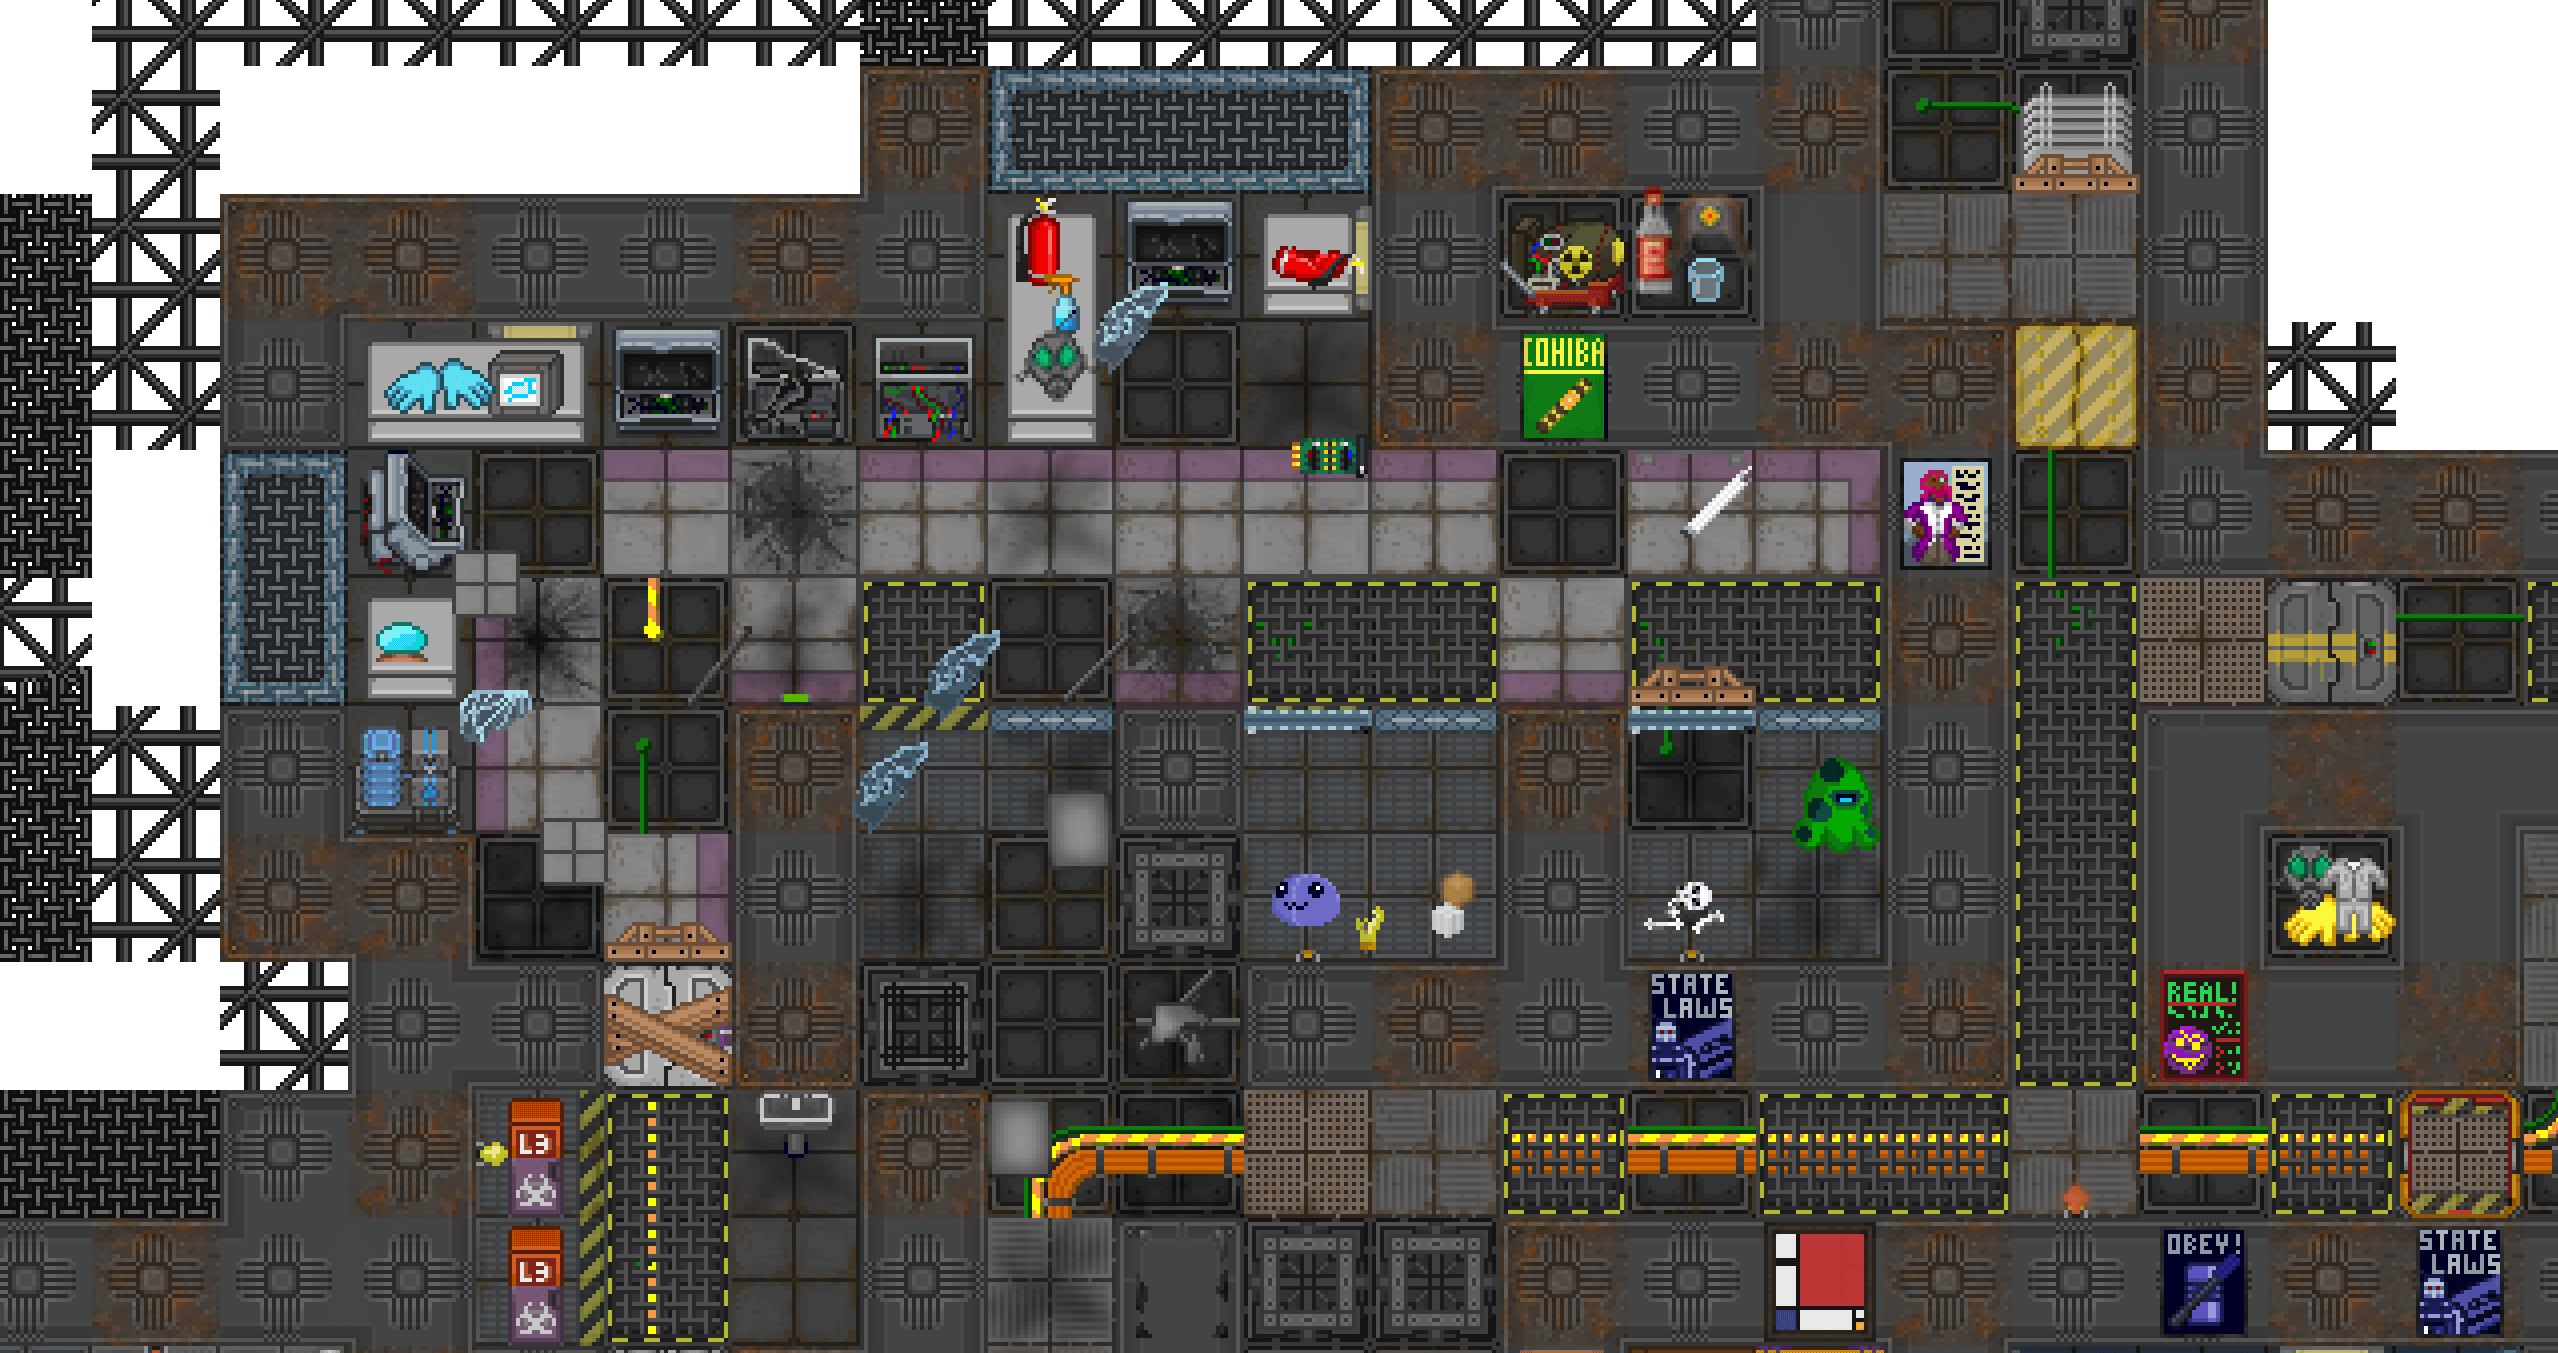
5. Junk Storage Room
Filled with crates, broken vendors, empty racks, and debris. Players will rummage, repurpose, or hide in these places. They’re excellent for traitor roleplay.

[EXAMPLE IMAGE: Cluttered junk room]
6. Clown’s Cargo Bay
An abandoned storage area covered in stickers, foam, and banana peels. Maybe there's a horn hidden somewhere. A clown might "claim" it mid-round and nobody will stop them.
[EXAMPLE IMAGE: Placeholder for clown-decorated maint room]
7. Hidden Botany Lab
Some hydroponics trays, grow lights, and a locker full of nutrient mix. Maybe it was a botanist's side project. Maybe it’s growing something illegal.
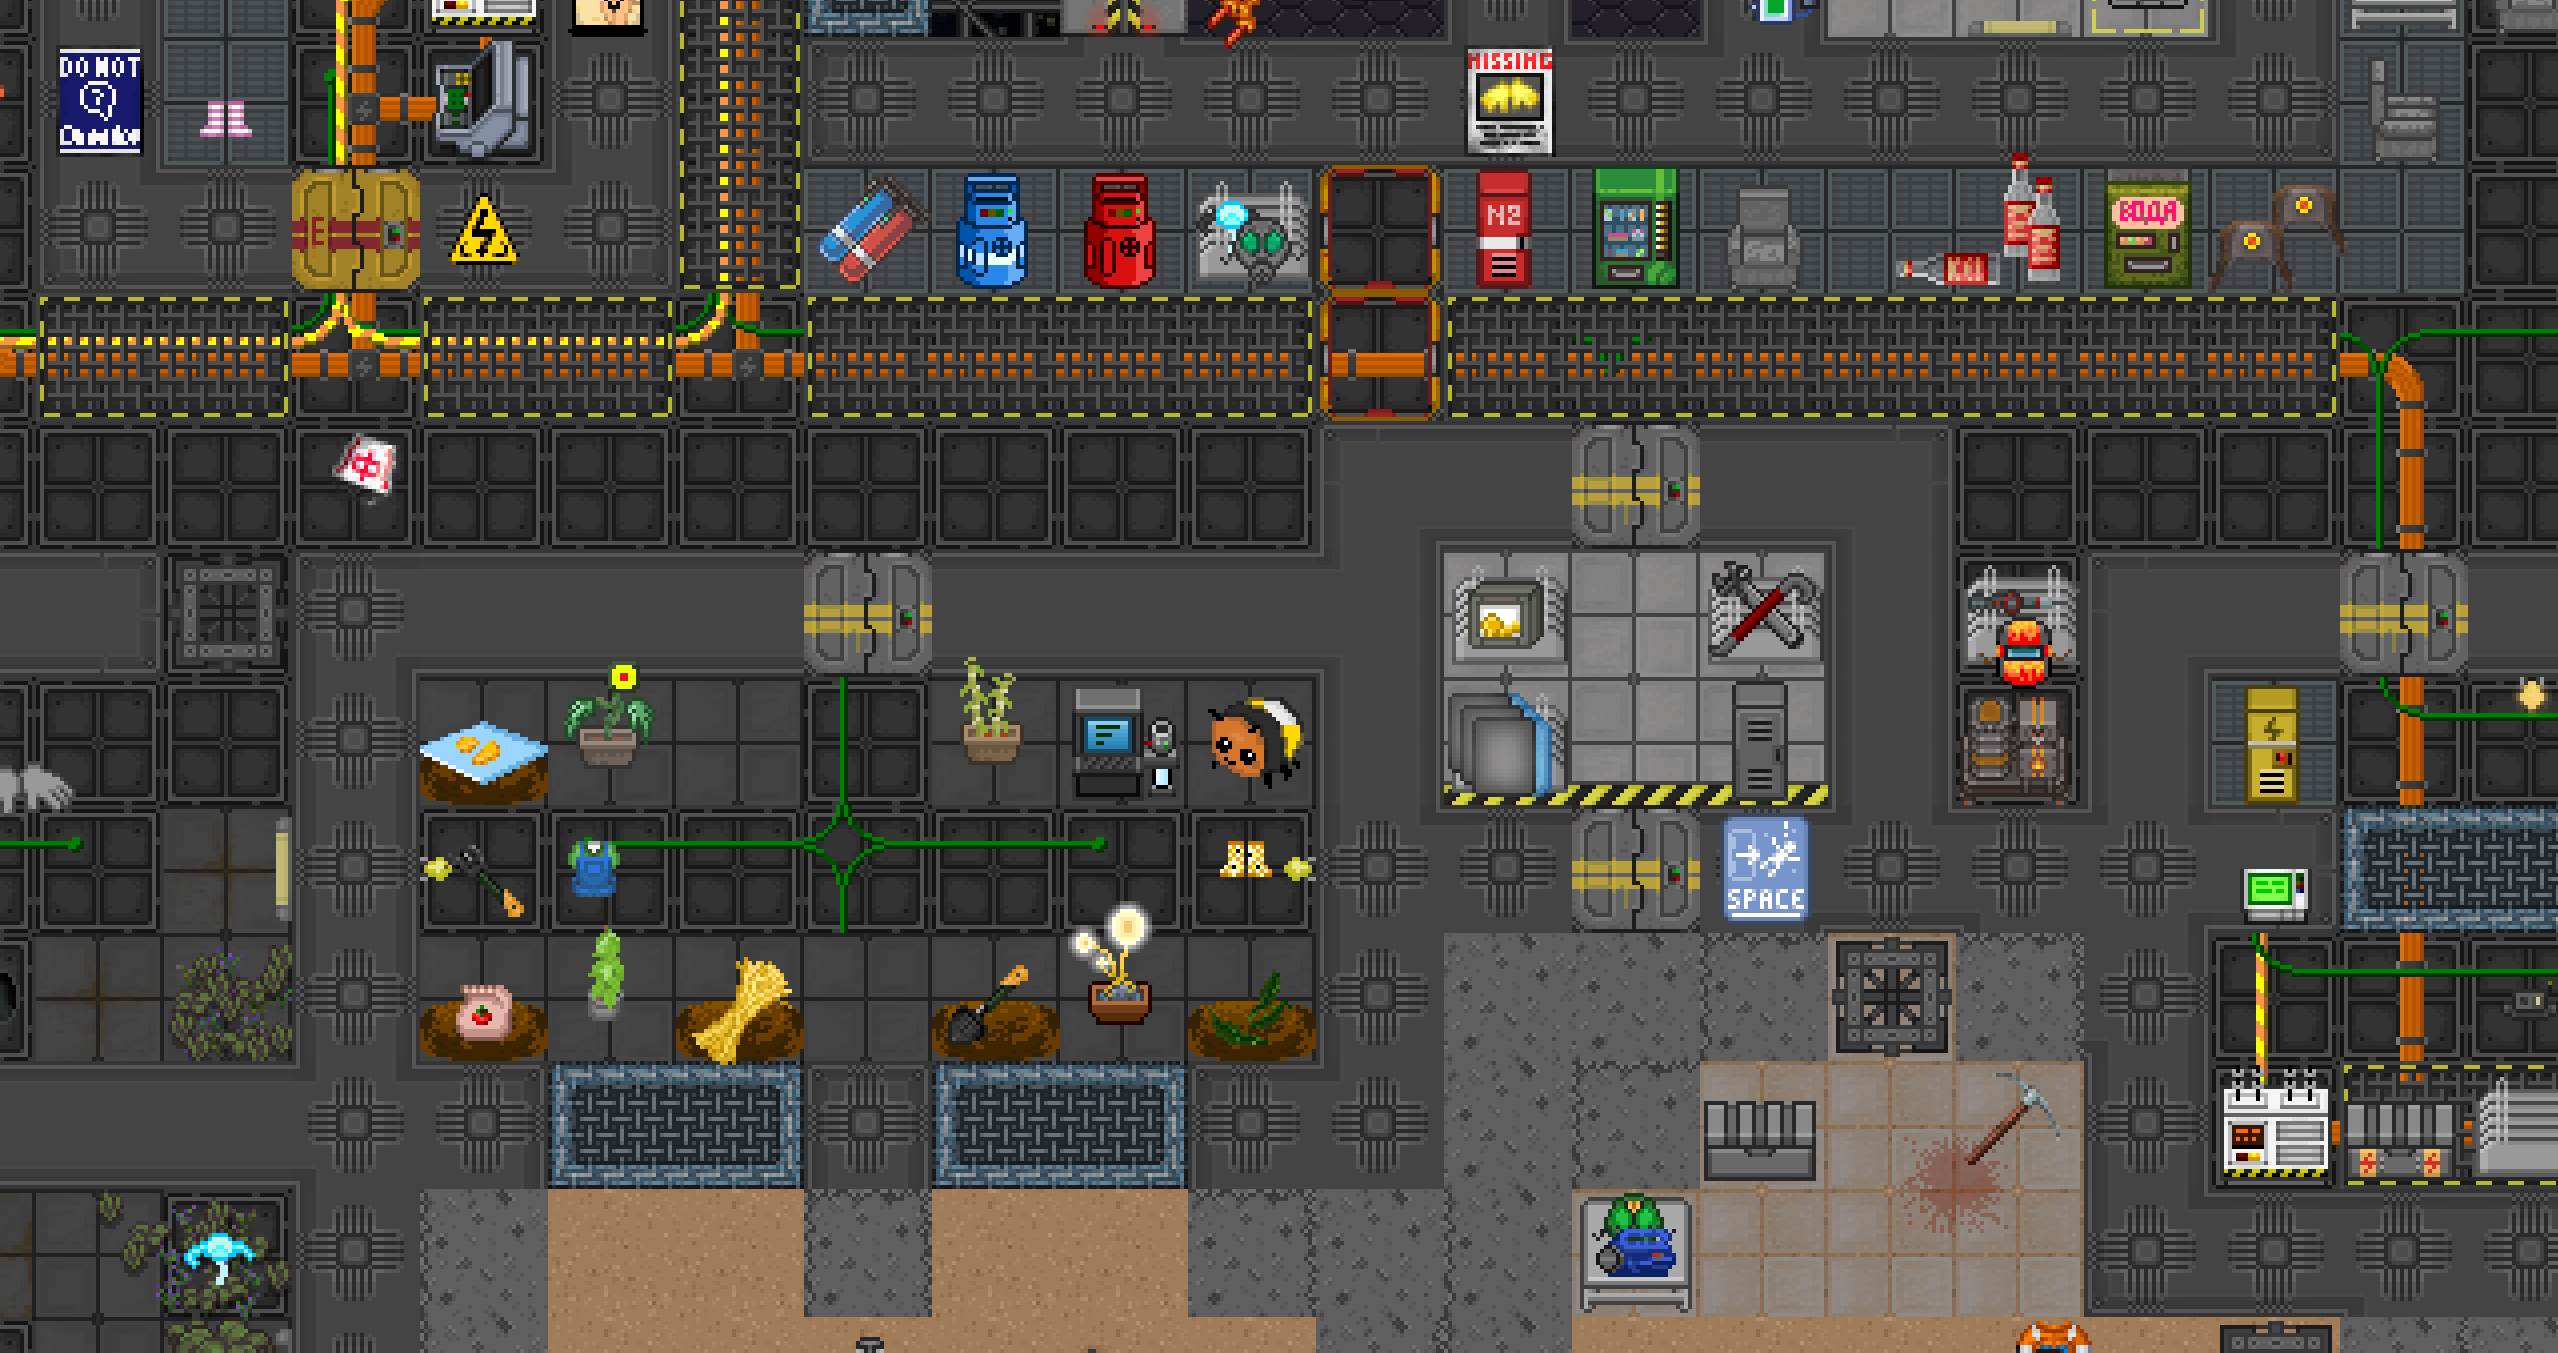
[EXAMPLE IMAGE: Secret grow room]
8. Chemistry Den
Set up like a space-age Walter White lab. A beaker here, a grinder there, some vents left unfiltered. Could be hidden behind a disguised wall or airlock.
[EXAMPLE IMAGE: Hidden chem lab]
9. Space-Watcher’s Room
A tiny pressurized room with glass facing space. One chair, maybe some notes, and binoculars. For the dreamers and loners among the crew.
[EXAMPLE IMAGE: Observatory corner]
10. Abandoned Robotics Lab
Destroyed frames on the floor, scrap parts laying around, a destroyed computer. Don’t use functioning fabs or circuits, it’s meant to look derelict. Great for ambiance and traitor bait.
[EXAMPLE IMAGE: Placeholder for ruined robotics room]
Engineering Systems in Maintenance
Maintenance isn’t just artistic. It serves the most practical purpose of all: keeping the station running. These tunnels are where Engineers access:
- Cabling and power distribution
- Atmospherics and piping networks
- Disposals routing and junctions
- Substations, SMES, air refill points, and emergency supplies
- Oxygen, Nitrogen, and Air Canisters
- Water and Fuel Tanks
If a maintenance hallway exists without giving Engineers a reason to enter it, you may be missing a critical part of its design. These infrastructure features are what justify the term “maintenance” in the first place.
Locking Rules for Maintenance Doors
To balance accessibility with security, only entry and exit points of maintenance paths should use the locked variant of maintenance doors. Internal doors between maintenance rooms should use the unlocked variant.
Final Thoughts
A station without good maintenance is a clean corpse. There's nothing pulsing beneath the surface, nothing for players to wonder about, no secrets to uncover, no tension in the dark.
Great maintenance isn’t flashy. It’s felt. A hallway that saves a life. A tunnel that becomes a murder scene. A quiet room where a crewman builds a bar out of scrap.
That’s the kind of map people remember. So map it like it matters. Because it does.
How to start mapping
How to Start Mapping
So you want to make a map. Good choice. Mapping in Space Station 14 takes patience, curiosity, and a bit of stubbornness. The tools are tricky, and it’s easy to get overwhelmed. But once you get the hang of it, it’s one of the most satisfying ways to leave your mark on the game.
Step 1: Set Up Your Mapping Environment
Start by finding the respective server build that you want to map for (usually linked through Discord, GitHub, or the server wiki). Download the most recent ZIP build, extract it, and follow these steps:
- Open the extracted folder and run
Robust.Server. - Launch the SS14 client and connect to
localhost.
You can follow a full server setup guide here if you don't want to follow this guide.
Personally, I’d recommend running a local build, it’s more stable and crashes a lot less than a dev environment. Tanuko pointed this out early on, and they’re absolutely right. SlamBamActionman also suggests just jumping into the game and building something small without any intention to save it. Play around, test out the tools, and get a feel for the commands. No pressure, just exploration.
Step 2: Start Small (Shuttles or Debris)
Shuttles are like compressed micro-stations. They're a great way to get a feel for power, cabling, atmos, layout, and aesthetics on a manageable scale. Debris areas or small off-station maps are another low-stakes entry point.
Don’t start with a station. That’s a massive commitment. Power layout, subnets, pipes, decals, maintenance, firelocks, and more. It’s very easy to burn out.
My best advice: Pick up a pre-existing,
unmaintained project and work from there. A lot of people, myself included, started by mapping something
that already existed but wasn’t maintained.
“Starting with shuttles is easier because there’s a lot of little engineering stuff that you're likely to mess up and want to re-do in quick succession.”
CptJeanLuc, Creator of Oasis
“Be the best you can and put your pedal to the metal. My tip is to start small.”
spankyspanky, Mapping Lead on WizDen
Sketch your layout before jumping into the game. Use paper or a pixel art tool (1 pixel = 1 tile). Compare sizes with existing stations for reference.
“Don’t get too attached to your outline. You’ll realize you forgot space for something. Leave room to expand.”
SlamBamActionman, Creator of Exo
Step 3: Core Mapping Commands
mapping [mapID]- Creates a new map layer with that ID.mapping [mapID] [path]- Loads an existing map from the specified path.savemap [mapID] [path]- Saves the current map state. Do not use theforceoption unless you know what you're doing.
The mapping command does autosave periodically, but don’t rely on it. If it silently fails, you could lose hours of progress.
Step 4: Test Your Map
fixgridatmos [mapID]- Enables atmos simulation and lets you see grid IDs. This must be run before any real testing.variantize [mapID]- Applies visual tile variations so everything doesn’t look identical.fixrotations- Aligns all placed entities to face south (default).tilewalls- Adds plating below walls. Be cautious with diagonal walls or meteor maps.
mapinit [mapID]- Fully initializes the map. Spawns vending machines, random spawners, etc.unpausemap [mapID]- Allows mobs to move and interact. You must do this to test your map properly.tp [x] [y] [mapID]- Teleports you to a specific coordinate on a map.rmmap [mapID]- Removes a map from memory. Useful for clean-up when working on test layers.
After using mapping, you will remain a
regular MobObserver, but unable to move. Switch to an initialized map and run aghost to regain
movement control.
If you accidentally delete your ghost, you can teleport
to the admin zone and aghost again.
Step 5: Helpful Tools
mappingclientsidesetup- Enables your full sidebar setup, including:showsubfloortogglelightnodevis- Displays node connections for cables and pipes. Helps find disconnected pieces or duplicate grilles under windows.
“The mass scanner is your best friend - make sure your grid is all connected all the time.”
whythelettuce
When placing tiles for a new grid, place them one-by-one at first. Placing large squares too early can cause unconnected grids to form. You’ll regret it later.
Step 6: Editor Shortcuts and Placement Tips
- SHIFT-click - Places a line of tiles or objects along a snap grid.
- CTRL-click - Places a square of tiles or objects.
- P - Picks the currently highlighted tile or entity prototype for placement (not a full copy).
- zoom 3 - Zooms out by a factor of 3. Use
zoom 1to reset. You can also use Numpad 4, 5 and 6 to do this.
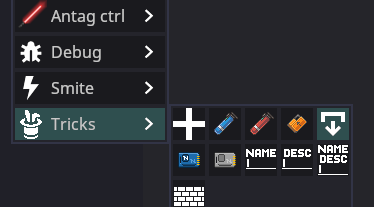
Mapping Actions Toolbar
You can assign tile, decal, and entity actions
to the toolbar for easy access. Clicking on a slot while in placement mode stores the current selection in
that slot. To load a full preset of mapping actions, use mappingclientsidesetup. This is reset
when you ghost or switch entities.
Step 7: Atmos Layout and Pipe Colors
Atmos setup is an essential part of mapping, especially when designing departments like Engineering, Atmospherics, and Research. To keep things readable and maintainable, use standardized pipe colors. This helps both players and other mappers understand the function of each pipe at a glance.
Standard Pipe Colors
- Waste loop:
#990000FF(red) - Distro loop:
#0055CCFF(blue) - Air:
#03FCD3FF(cyan) - Mix:
#947507FF(brown)
Legacy Colors
- Old Waste:
#FF1212FF - Old Distro:
#0335FCFF
My Choices for TEG Systems
- TEG Cold Loop:
#50ABE7FF - TEG Hot Loop:
#DA2A2AFF - TEG Burn Mix:
#7F6306FF
To color a pipe network, use the command:
colornetwork [eID] Pipe #[hex]Avoid using passive vents for gas input. They are ineffective and unreliable. Always use air injectors instead. Scrubbers are optional, but highly recommended for controlled environments like artifact labs or containment rooms.
"Please please please please map air injectors in artifact chambers. Scrubbers are nice too, but good god passive vents suck. Stop mapping passive vents for gas input."
ornamentalfreak
Step 8: Testing and Cleaning Up Your Map
mapinit [mapID]- Fully initializes the map layer. This spawns vending machines, random entities, and any spawners.unpausemap [mapID]- Unpauses the map so you can move and interact with it. Maps are paused by default after being created.
Once you mapinit a map, you should
no longer attempt to save it. It becomes post-init and unpredictable for future loading or editing. If you
need a fresh copy, delete the map and reload it using the same commands as before.
tp [x] [y] [mapID]- Teleports you to a specific coordinate on a given map layer. For example,tp 0 0 7puts you at the center of map layer 7.rmmap [mapID]- Removes a map layer from memory. Use this only for maps you’ve finished testing or no longer need.
After using the mapping command, your
ghost cannot move. This is because you're still a MobObserver, and need to be upgraded to an
AdminObserver to move freely again.
- To fix this, go to an initialized map like the devmap or CentCom.
- Run
aghostto regain movement and full mapping powers.
If you accidentally delete your ghost, teleport to the
admin zone and use aghost again. Don’t panic, it’s fixable.
"Try not to delete your ghost, but if it happens you can always send yourself to your adminzone to fix it."
whythelettuce
Step 9: Useful Tools and Debug Commands
mappingclientsidesetup- Automatically run after usingmapping, but you can also run it manually. It:- Enables
showsubfloor(for cables and pipes) - Enables
togglelight - Populates your sidebar with tiles, windows, and wall tools
- Enables
nodevis- Highlights cable and pipe node connections. This helps you spot loose wires, broken networks, or overlapping grilles (like under windows).fixgridatmos [gridID]- Enables atmospheric simulation on your grid. Also helpful to autocomplete your current map ID.variantize [gridID]- Randomizes tile appearance so your station doesn’t look copy-pasted.fixrotations- Aligns all placed entities to face south.tilewallsAdds plating under every wall. Avoid if your map has meteors, as it will overwrite rocks with floor tiles.
Place your first tiles one by one when starting a new
grid. If you use CTRL+Click or SHIFT+Click too early, you may accidentally create
multiple disconnected grids. These can be hard to detect without using a mass scanner or nodevis.
"The mass scanner is your best friend - make sure your grid is all connected all the time."
whythelettuce
Step 10: Placement Shortcuts and Mapping Actions
- SHIFT + Click - Places a straight line of tiles, walls, windows, or entities along the snap grid.
- CTRL + Click - Places a square selection of items along the snap grid.
- P (Pick key) - Selects the tile or entity currently highlighted under your cursor. This copies the prototype, not the specific instance.
- zoom N - Changes the zoom level of the camera.
zoom 3zooms out 3x;zoom 1returns to default. Numpad 4, 5 and 6 can also be used for this.
Mapping Actions Toolbar
The mapping toolbar allows you to bind entity, tile, or decal placement tools to numbered hotbar slots for fast switching.
- Click on an entity, tile, or decal to select it for placement.
- Right-click a slot to remove the assigned action.
You can reset or re-populate the toolbar using
mappingclientsidesetup. Remember that toolbar actions are tied to your controlled entity, if
you ghost or possess someone else, you’ll lose them.
There is no copy-paste. If you want to move something five tiles over, you’ll need to re-place it by hand. If you want to rotate something 90 degrees, you have to do that manually too.
Step 8: Plan Your Maintenance
Maintenance isn’t just leftover space between departments, it’s a vital part of how a station breathes and functions. Good maints allow movement, support round flow, and give players (especially antagonists) creative options for sneaking, hiding, or just loitering.
One of the most common mistakes new mappers make is not planning maints from the start. They’ll pack departments too tightly or forget to leave routes around and between them. The result is a map where maints are an afterthought, and it shows.
"A lot of new mappers fall into the trap of not putting enough planning into maints. Maints is core and integral to round flow, no matter the roleplay level. It gives agency to antagonists, who can slip through the station while avoiding security. It gives agency to crew, who can avoid firefights, spaced areas, etc. by going through maints."
ArtisticRoomba
Try to design your station so that it can be circled in maints without relying too much on the main hallways. Ideally, a player should only have to cross a hallway for a few tiles at a time. Don’t be afraid to let maints cut through departments, done well, it opens up new gameplay opportunities.
"The key to having good maints is to incorporate it into your map at the very beginning. Don’t be afraid to have maints cut through departments. Packed does this with Science and it’s cool."
ArtisticRoomba
Besides functional loops, think about "deep maints", isolated or offshoot maintenance areas that don’t connect anything, but serve as hideouts, workshops, or flavor zones. A good map has both practical and flavorful maints.
"An important distinction between good and bad maints is if there are any deep maints. Deep maints is described as maintenance that doesn’t serve as a connection between departments, rather it’s a unique space with rooms for antagonists or crew to hide or build stuff in."
ArtisticRoomba
For examples and design advice, check the full Maintenance Mapping Guide.
Step 9: Collaboration and Feedback
Mapping is rarely a solo journey. Even if you're working alone, you’ll benefit from asking questions, testing your work with others, and getting second opinions. Collaboration helps you catch layout flaws, accessibility issues, or design missteps that might not be obvious until someone else walks through it.
"Ask plenty of questions."
Emisse
"Identify people who know a department well, and ask them so, so many questions."
ornamentalfreak
If you're building a department you're not familiar with, ask someone who plays it often. They’ll have strong opinions and that’s valuable. Test your map with friends or on a test server, and just walk around. Try to find things. Ask others if they can. It’ll reveal a lot.
"Making sure that there’s clear access both mechanically and visually to things you want players to interact with is huge."
ornamentalfreak
"The easier it is to remember your map, the more players will like it. Twisting hallways are not fun."
CptJeanLuc
"Be the best you can and put your pedal to the metal. My tip is to start small."
spankyspanky
Step 10: Finishing and Saving
Once your layout is complete and functional, it’s time to polish. This is when you can safely start placing decals, clutter, lighting, posters, plants, and all the little things that bring life to your map. But don’t rush into this stage early; you’ll end up redoing a lot of it if the layout changes.
"Do not bother decaling or making things look nice in-game until the map layout is more or less complete."
SlamBamActionman
Save things like firelock and atmos device linking for the end. These are very sensitive to layout changes and can become a pain to redo repeatedly.
Also keep in mind how objects interact with
tiles. Normal doors and airlocks will replace walls if placed on top of them. But windows won’t, they’ll
just double layer with whatever is beneath them. High-security doors (the black ones) do not replace walls
either. Clean up the tile underneath manually.
Personally, I like tiling the floor under windows with glass tiles. Most mappers default to plating, but I find the glass gives a cleaner, more intentional look. That part’s up to you.
Special Thanks
This guide wouldn’t exist without the feedback, insight, and experience generously shared by fellow mappers across the community. Thank you to everyone who contributed tips, philosophy, and lessons learned the hard way.
- SlamBamActionman for planning philosophy, layout flexibility, department purpose, and the idea that you don’t need to start big.
- spankyspanky: “Be the best you can. Put your pedal to the metal. Start small.”
- Tanuko for advice on avoiding unstable dev environments by mapping on a local build instead.
- CrimsonJupiter for the reminder that trial and error is part of the journey, and that sometimes it helps to map with a friend.
- whythelettuce for insight on movement flow, the importance of feedback, and technical commands.
- Southbridge for encouraging this guide from the start, offering review help, and reminding me (regrettably) that the map renderer exists.
- ornamentalfreak for guidance on interactable objects, department-specific layout checks, and why passive vents need to die.
- CptJeanLuc for practical engineering, layout efficiency, shuttle-first logic, and for creating the high-popular map Oasis.
- ArtisticRoomba for in-depth maintenance design philosophy and the importance of deep maints in station design.
- Emisse for keeping it simple: “Ask plenty of questions.”
Mapping is trial and error. Don’t be afraid to ask. Don’t be afraid to fail. Just keep building, you’ll get there.